Welcome to our guide on how to install a welded wire fence on wood posts! If you’re looking to add some extra security or create a boundary around your property, a welded wire fence is a fantastic option. Not only is it durable, but it’s also relatively easy to install. So, let’s dive in and learn how to get the job done!
In this step-by-step tutorial, we’ll walk you through the process of installing a welded wire fence on wood posts. You don’t need to be an expert DIY-er or have fancy tools to accomplish this project. With a little bit of time and effort, you’ll have a sturdy fence that will stand the test of time.
How to Install Welded Wire Fence on Wood Posts?
A Step-by-Step Guide to Installing a Welded Wire Fence on Wood Posts:
- Dig post holes, ensuring they are deep and wide enough.
- Set the wood posts in the holes, making sure they are level.
- Attach the wire fence panels to the first post, using fencing staples.
- Stretch the fence tightly between the posts, securing it with clamps.
- Attach the wire fence panels to the remaining wood posts.
- Trim excess wire and secure the ends.
- Add any additional features, such as gates or post caps.
1. Gathering the Materials
Before diving into the installation process, it’s crucial to gather all the necessary materials. You will need:
- Welded wire fencing: Choose a length and height suitable for your needs.
- Wood posts: Opt for sturdy and rot-resistant wood, such as cedar or pressure-treated pine.
- Wood screws or nails: These will be used to secure the wire fencing to the wood posts.
- Posthole digger: To dig holes for the wood posts.
- Level: To ensure your fence is straight and even.
- Measuring tape: To measure the distance between posts and ensure accuracy.
- Hammer and nails: Required for attaching any additional support beams.
Once you have all the materials ready, you can proceed to the installation process.
2. Planning and Marking
Before digging any holes or installing the fence, it’s essential to plan and mark out the area where the fence will be installed. Start by determining the boundaries and measuring the distance between each wood post. Mark the locations of the posts using stakes and string.
Next, consider the height of the fence and mark it on each wood post, ensuring consistency. You can use a chalk line or a measuring tape to create straight and level lines across the posts.
Take your time during this planning and marking phase, as it will directly impact the accuracy and appearance of your finished fence.
3. Digging the Holes
Once you’ve marked the positions of the wood posts, it’s time to start digging the holes. Use a posthole digger to create holes that are deep enough to provide stability and support for your fence. The depth will depend on the height of your wood posts and the desired height of your fence.
A general rule of thumb is to dig each hole approximately one-third the height of the wood post. For example, if your wood post is six feet tall, the hole should be around two feet deep.
Space the holes according to your initial planning, ensuring the correct distance between each post. To achieve a straight fence line, use a level to ensure the holes are aligned properly.
4. Setting the Wood Posts
Now that the holes are ready, it’s time to set the wood posts. Start by placing the first wood post into one of the holes, making sure it is plumb, or perfectly vertical. Use a level to check the alignment on multiple sides of the post before proceeding.
Once the first post is in place, fill the hole with soil, ensuring it is tightly packed to provide stability. Repeat the process for each wood post, ensuring they are all straight and level.
If desired, you can add additional support beams to strengthen the fence. Attach them securely to the wood posts using nails or screws.
5. Attaching the Welded Wire Fence
With the wood posts securely in place, it’s time to attach the welded wire fence. Start by unrolling the fence along the length of the fence line, ensuring it is pulled taut. Use wood screws or nails to attach the fence to each wood post, starting from the top and working your way down.
Be sure to evenly space the attachments to ensure the fence is securely fastened. As you progress, check for any wrinkles or sagging in the wire and make adjustments accordingly.
Once the fence is attached to all the wood posts, trim any excess wire with wire cutters and secure the ends to prevent any sharp edges.
6. Finishing Touches
After attaching the welded wire fence, take a step back and inspect your work. Use a level to ensure the fence is straight and adjust any sections that may have become uneven during the installation process.
If desired, you can also add additional gates or entrances to your fence. This will require similar steps of setting wood posts and attaching the welded wire fence.
Lastly, consider adding a protective finish, such as paint or sealant, to the wood posts to extend their lifespan and maintain their appearance over time.
7. Maintenance and Care
Once your welded wire fence is installed, it’s important to stay on top of maintenance to ensure its longevity. Regularly inspect the fence for any signs of damage, such as loose wires or rotting wood posts.
Perform any necessary repairs promptly to prevent further damage. Additionally, consider adding a protective barrier, such as a weather-resistant coating, to the welded wire fence to further enhance its durability.
By following these maintenance practices, you can keep your welded wire fence looking great and functioning properly for years to come.
Additional Tips and Considerations
Aside from the installation process, here are some additional tips and considerations to keep in mind when installing a welded wire fence on wood posts:
1. Choosing the Right Fencing Material:
Welded wire fencing comes in different gauges and mesh sizes. Consider the purpose of your fence and choose the appropriate fencing material for your needs. Thicker gauges provide added strength and durability, while smaller mesh sizes offer greater security.
2. Checking Local Regulations:
Before embarking on your fence installation project, be sure to check local regulations and obtain any necessary permits. Some areas have specific guidelines regarding fence height, placement, and materials.
3. Adding Support Beams:
If you’re installing a taller fence or live in an area with high winds or other adverse weather conditions, consider adding horizontal support beams between the wood posts. These beams provide additional stability and prevent the fence from bending or sagging.
4. Securing the Fence to the Ground:
To prevent animals from burrowing under the fence, consider burying a portion of the welded wire mesh below the ground. This will create a barrier and further secure your enclosed area.
5. Regularly Inspecting and Repairing:
Regularly inspect your welded wire fence for any signs of damage or wear and tear. Promptly repair any loose wires, damaged posts, or sections that may have come loose.
Installing a welded wire fence on wood posts can be a straightforward and rewarding project. By following the steps outlined in this article and considering the additional tips and considerations, you can create a durable and aesthetically pleasing fence that meets your needs.
Keep up with regular maintenance to ensure the longevity of your fence and enjoy the benefits it provides for years to come.
Frequently Asked Questions
Welcome to our Frequently Asked Questions section where we address common queries on how to install a welded wire fence on wood posts. Read on to find answers to your questions!
1. Can I install a welded wire fence on existing wood posts?
Yes, you can install a welded wire fence on existing wood posts. Make sure the posts are sturdy and in good condition, free from rot or damage. Measure the distance between the existing posts to determine the length of the wire fence needed.
Use fence ties or staples to secure the wire fence to the wood posts at regular intervals. It’s essential to ensure a tight and secure fit for a durable fence installation.
If the existing posts are too far apart, you may need to add additional posts for support.
Use a post-hole digger to create holes for the new posts, ensuring they are evenly spaced. Set the posts in the holes and secure them with concrete for stability. Once the new posts are in place, you can proceed with installing the welded wire fence following the same steps as for existing posts.
2. What tools do I need to install a welded wire fence on wood posts?
To install a welded wire fence on wood posts, you’ll need a few tools. These include a post-hole digger, a shovel, a level, a tape measure, a hammer, fence ties or staples, and a wire cutter. The post-hole digger will help you create holes for the wood posts, while the shovel is handy for digging and leveling the ground.
The tape measure will enable you to accurately measure the distance between the posts and determine the length of the wire fence needed.
A level is essential for ensuring that the posts are straight and upright. Use the hammer to secure the wood posts in the ground and the wire cutter to trim the welded wire fence to the desired size. Having these tools on hand will make your installation process much easier and more efficient.
3. How deep should I dig the post holes for a welded wire fence on wood posts?
When installing a welded wire fence on wood posts, it’s crucial to dig post holes that are deep enough for stability. As a general rule of thumb, aim for a hole depth of around one-third to one-half the height of the wood post. For example, if your posts are 6 feet tall, the holes should be dug to a depth of 2 to 3 feet.
Ensure that the post holes are wide enough to accommodate the width of the wood posts while leaving space for concrete or gravel for added stability. It’s essential to compact the soil at the bottom of the holes to provide a solid base for the posts.
Use a level to check the posts’ alignment, both vertically and horizontally, before filling the holes with concrete or gravel and allowing it to set. This will help ensure a sturdy and long-lasting fence installation.
4. Should I use concrete or gravel to secure the wood posts for a welded wire fence?
When securing the wood posts for a welded wire fence, you have the option of using either concrete or gravel. Concrete offers a more permanent and stable solution, particularly in areas with heavy wind or soil conditions. To use concrete, pour it into the post hole after setting the wood post.
Ensure the concrete is level with or slightly above ground level, sloping away from the post to prevent water pooling. Allow the concrete to cure as per the manufacturer’s instructions before proceeding with the fence installation.
If you prefer a more flexible and less permanent option, you can use gravel as an alternative to concrete. After setting the wood posts, fill the post holes with gravel, ensuring it is tightly packed. Gravel allows for easier adjustment and movement of the wood posts if needed.
It also provides good drainage and helps prevent moisture-related issues. However, keep in mind that gravel may require periodic maintenance to ensure the wood posts remain stable over time.
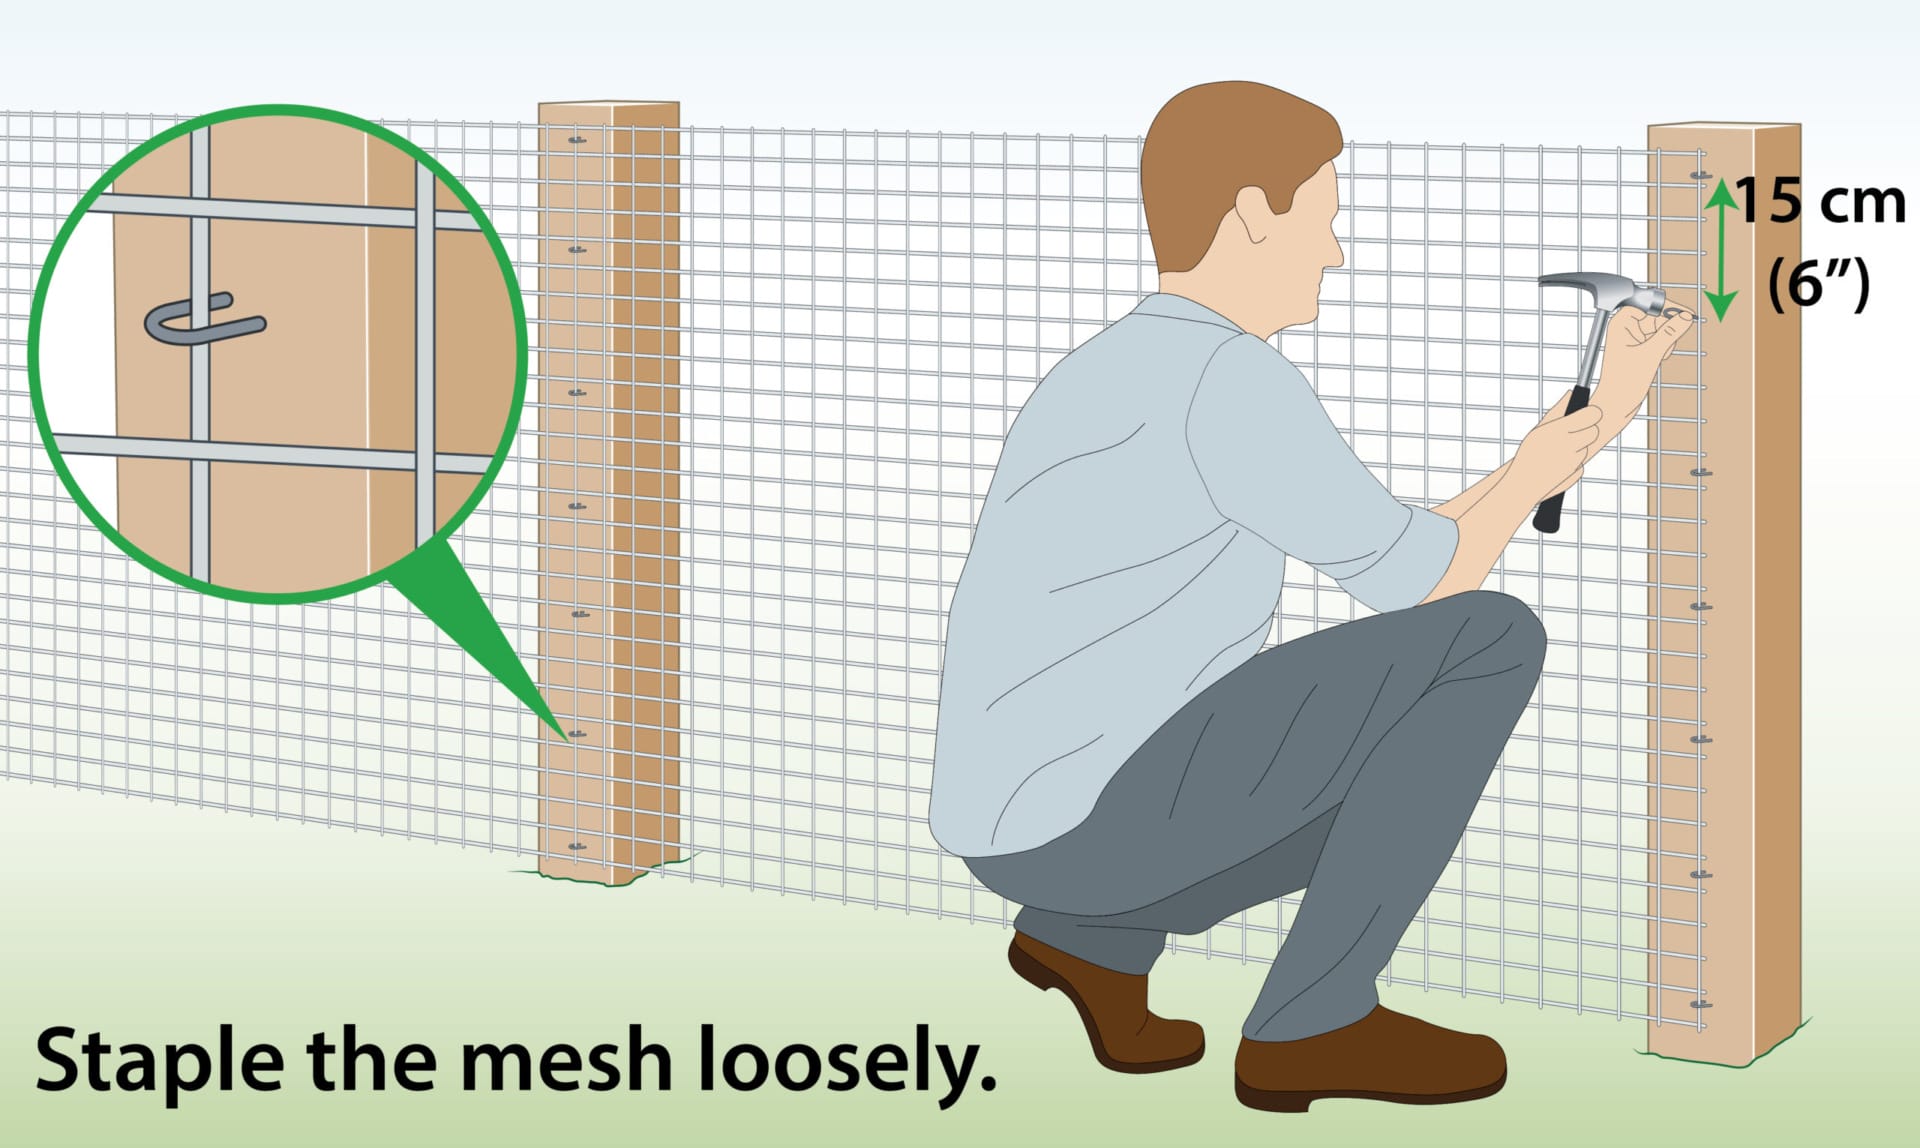
5. How do I attach the welded wire fence to the wood posts?
To attach the welded wire fence to the wood posts, you can use fence ties or staples. Fence ties are flexible wire pieces that you can wrap around the wire fence and securely fasten to the wood posts. They provide a sturdy connection while allowing some flexibility.
Fence staples, on the other hand, are U-shaped metal fasteners that are driven into the wood posts through the wire fence, providing a secure and tight attachment.
Start by unrolling the welded wire fence along the length of the wood posts, ensuring it is centered and straight. Use fence ties or staples at regular intervals, approximately every 12 to 18 inches, to secure the wire fence to the wood posts.
Make sure to tighten the ties or staple the fence firmly to prevent sagging or gaps. Repeat the process for all sides of the fence until it is fully attached to the wood posts. Regularly inspect the fence for any loose ties or staples and make necessary adjustments to maintain a secure and well-installed welded wire fence.
So, now you know how to install a welded wire fence on wood posts. Start by marking the post locations and digging the holes. Then, set the posts in concrete and attach the fence panels. Finally, secure the fence to the posts using fencing staples. It’s important to make sure the fence is level and secure for the best results. With these simple steps, you’ll have a sturdy fence in no time!
Remember to always wear gloves and safety goggles when working with tools. Double-check your measurements and take your time to ensure a successful installation. Now go ahead and enjoy the privacy and security that your new welded wire fence provides!