Welcome to the world of AirPods and iPhones, where technology meets convenience!
Have you ever wondered how to change AirPod settings on your iPhone? Well, you’ve come to the right place! In this guide, we’ll walk you through the simple steps to customize your AirPods to suit your preferences. So, let’s dive right in and explore the exciting world of AirPod settings!
Whether you want to adjust the volume, change the playback options, or even personalize the double-tap functionality, we’ve got you covered.
By mastering the art of tweaking AirPod settings on your iPhone, you can make your listening experience truly your own. So, whether you’re a music enthusiast or love binge-watching your favorite shows, let’s unlock the full potential of your AirPods together!
Ready to take control of your audio world? Stay tuned as we reveal the secrets to changing AirPod settings effortlessly.
With just a few taps on your iPhone, you’ll be able to fine-tune your AirPods and enjoy a whole new level of wireless audio bliss. Let’s get started on this exciting journey of customization and make your AirPods truly shine in the way you want them to!
How to Change AirPod Settings on iPhone
- Open your iPhone’s Settings.
- Select “Bluetooth”.
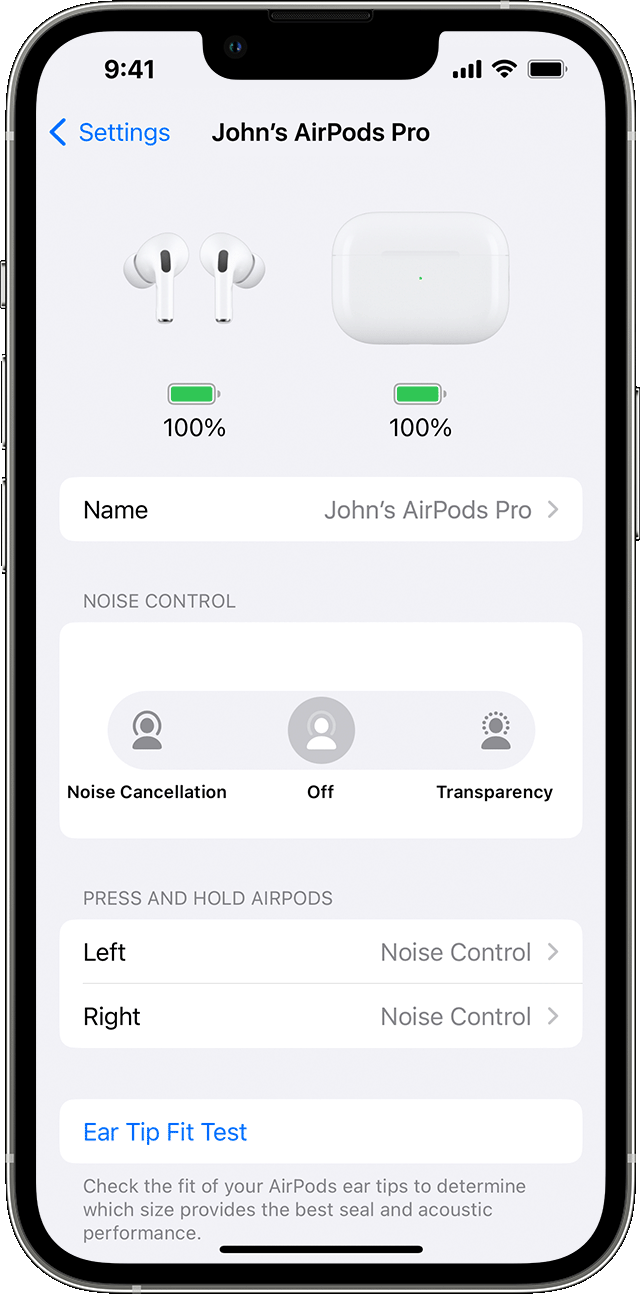
- Tap the “i” icon next to your Airpods.
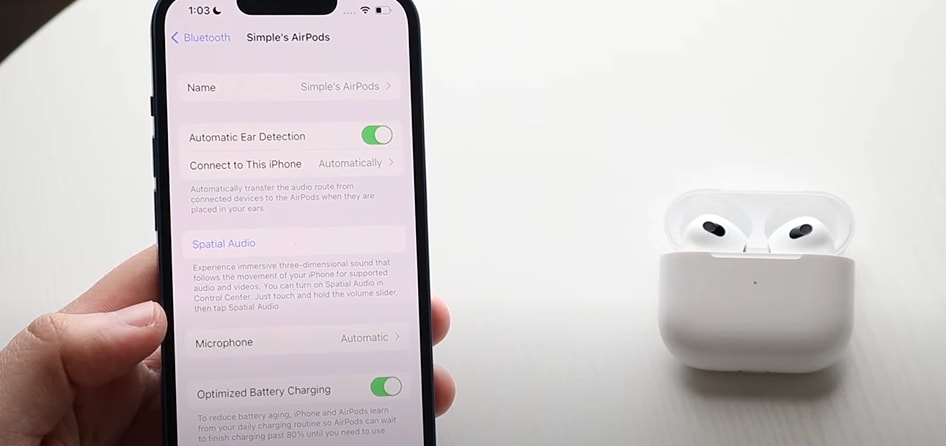
- Adjust settings like Automatic Ear Detection, Microphone, and Press and Hold options.
- Enable or disable Noise Cancellation and Transparency mode.
Connecting Your AirPods to Your iPhone
Before delving into the various settings and customization options, it is important to ensure that your AirPods are properly connected to your iPhone. Follow these simple steps to connect your AirPods:
Step 1: Open the AirPods Case
To begin, open the lid of your AirPods case. Ensure that your AirPods are charged and ready for use.
Step 2: Enable Bluetooth on Your iPhone
Next, unlock your iPhone and swipe up from the bottom of the screen to access the Control Center. Tap on the Bluetooth icon to enable Bluetooth connectivity.
Step 3: Pair Your AirPods
With Bluetooth enabled, hold your AirPods case close to your iPhone. A prompt should appear on your iPhone’s screen, asking if you want to connect your AirPods. Tap “Connect” to complete the pairing process.
Your AirPods are now connected to your iPhone, and you can begin customizing the settings to suit your preferences.
Customizing AirPod Settings on Your iPhone
Now that your AirPods are connected to your iPhone, let’s explore the various settings you can customize to enhance your listening experience:
1. Changing AirPods Name
By default, your AirPods are assigned a generic name. You can personalize this name to make it easier to identify your AirPods when connecting to multiple devices. Here’s how:
Step 1: Open “Settings”
Unlock your iPhone and tap on the “Settings” app icon on your home screen.
Step 2: Select “Bluetooth”
In the Settings menu, scroll down and tap on “Bluetooth.”
Step 3: Find Your AirPods
Under the “MY DEVICES” section, you will see a list of Bluetooth devices connected to your iPhone. Locate your AirPods from the list and tap the “i” icon next to their name.
Your AirPods are now personalized with a unique name, making them easier to identify when connecting to your iPhone or other devices.
2. Adjusting AirPods’ Double-Tap Function
The AirPods’ double-tap function allows you to perform various actions by double-tapping your AirPods. By default, this function is set to play/pause audio. However, you can customize this setting to suit your preferences. Here’s how:
Step 1: Open “Settings”
Unlock your iPhone and tap on the “Settings” app icon on your home screen.
Step 2: Select “Bluetooth”
In the Settings menu, scroll down and tap on “Bluetooth.”
Step 3: Configure Double-Tap Function
Under the “MY DEVICES” section, locate your AirPods and tap the “i” icon next to their name. In the AirPods settings menu, tap on the “Double-Tap on AirPod” option.
From here, you can choose between the available options: Siri, Play/Pause, Next Track, Previous Track, or Off. Select your preferred action by tapping on the desired option.
You can now double-tap your AirPods to perform the customized function you have set.
Customizing Audio Settings for AirPods
While the default audio settings of your AirPods are optimized for most users, you can further enhance your listening experience by adjusting the audio settings according to your preferences. Here are some ways to customize the audio settings for your AirPods:
1. Changing the EQ Settings
The EQ (Equalizer) settings allow you to fine-tune the audio output of your AirPods, emphasizing specific frequencies to suit different genres of music or personal preferences. To adjust the EQ settings:
Step 1: Open “Settings”
Unlock your iPhone and tap on the “Settings” app icon on your home screen.
Step 2: Select “Music”
In the Settings menu, scroll down and tap on “Music.”
Step 3: Tap on “EQ”
Under the “Playback” section, tap on “EQ.”
From here, you can choose from the available EQ presets or create a custom EQ setting by selecting “Custom.” Experiment with the different presets or create your own to find the audio profile that suits your preferences.
2. Adjusting Volume Balance
If you find that the volume balance is uneven between your left and right AirPods, you can adjust the volume balance to ensure a more balanced listening experience. Here’s how:
Step 1: Open “Settings”
Unlock your iPhone and tap on the “Settings” app icon on your home screen.
Step 2: Select “Accessibility”
In the Settings menu, scroll down and tap on “Accessibility.”
Step 3: Tap on “Audio/Visual”
Under the “Hearing” section, tap on “Audio/Visual.”
Finally, use the slider to adjust the left/right audio balance according to your preference.
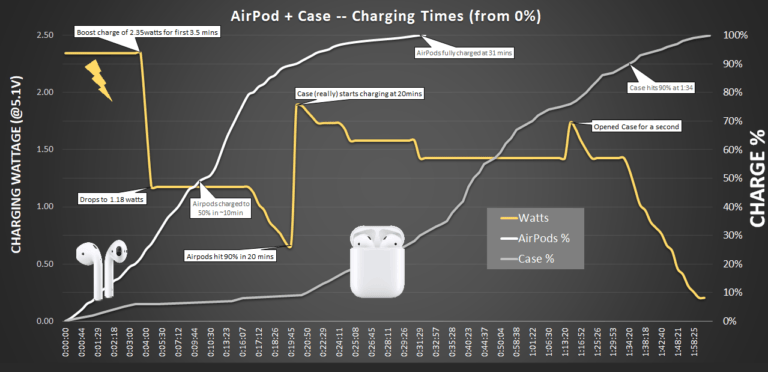
Managing AirPods Battery Life
One important aspect of owning AirPods is managing their battery life to ensure uninterrupted usage. Here are some tips to help you make the most of your AirPods’ battery life:
1. Enabling Low Power Mode
AirPods are equipped with an intelligent feature called Low Power Mode, which helps extend their battery life. To enable Low Power Mode for your AirPods:
Step 1: Open “Settings”
Unlock your iPhone and tap on the “Settings” app icon on your home screen.
Step 2: Select “Bluetooth”
In the Settings menu, scroll down and tap on “Bluetooth.”
Step 3: Tap on the “i” Icon
Locate your AirPods under the “MY DEVICES” section and tap the “i” icon next to their name.
Toggle on the “Low Power Mode” option to optimize battery usage and prolong the battery life of your AirPods.
2. Disabling Automatic Ear Detection
The Automatic Ear Detection feature allows your AirPods to automatically pause audio playback when you remove them from your ears. While this feature can be convenient, it may also drain your AirPods’ battery unnecessarily. To disable Automatic Ear Detection:
Step 1: Open “Settings”
Unlock your iPhone and tap on the “Settings” app icon on your home screen.
Step 2: Select “Bluetooth”
In the Settings menu, scroll down and tap on “Bluetooth.”
Step 3: Tap on the “i” Icon
Locate your AirPods under the “MY DEVICES” section and tap the “i” icon next to their name.
Toggle off the “Automatic Ear Detection” option to enable continuous audio playback, even when you remove your AirPods from your ears.
3. Adjusting AirPods’ Microphone Settings
Your AirPods are equipped with built-in microphones that allow you to make phone calls, use voice commands, and interact with Siri. To adjust the microphone settings of your AirPods:
Step 1: Open “Settings”
Unlock your iPhone and tap on the “Settings” app icon on your home screen.
Step 2: Select “Bluetooth”
In the Settings menu, scroll down and tap on “Bluetooth.”
Step 3: Tap on the “i” Icon
Locate your AirPods under the “MY DEVICES” section and tap the “i” icon next to their name.
From the AirPods settings menu, you can toggle on or off the “Noise Cancellation” and “Transparent” modes, depending on your environment and audio preferences.
Changing the AirPod settings on your iPhone can greatly enhance your overall audio experience. From personalizing the name and customizing the double-tap function to adjusting the audio and managing battery life, these settings offer you full control over how you use and enjoy your AirPods.
Experiment with the various options and find the combination that suits your preferences and lifestyle best. With these tips and tricks, you can maximize the potential of your AirPods and enjoy seamless wireless audio.
Frequently Asked Questions
AirPods are a popular wireless earbud option for iPhone users. Changing the settings can enhance your listening experience and customize them to your preferences. Here are some common questions related to changing AirPod settings on an iPhone and their answers:
1. How do I adjust the volume on AirPods?
To adjust the volume on your AirPods using your iPhone, you can use either the volume buttons on your device or the control center. When you’re listening to audio, you can use the physical volume buttons on your iPhone to increase or decrease the volume. Alternatively, swipe down from the top-right corner of your iPhone screen to access the Control Center and adjust the volume from there.
2. Can I change the double-tap settings on my AirPods?
Yes, you can change the double-tap settings on your AirPods. By default, a double-tap on either AirPod will play or pause the audio. However, you can customize this behavior according to your preference. Open your iPhone’s settings, go to Bluetooth, tap the “i” button next to your AirPods, and select “Double-Tap on AirPod” to choose from a range of options, such as skipping to the next track or activating Siri.
3. How do I find my AirPods if they are misplaced?
If you’ve misplaced your AirPods and they are within range, you can use the Find My app on your iPhone to help locate them. Open the app, select the “Devices” tab, and choose your AirPods from the list. You will see their last known location on a map. If they are nearby, you can use the “Play Sound” option to make them emit a sound, helping you find them easily.
4. Can I use AirPods with Siri?
Yes, you can use AirPods with Siri. To activate Siri, you can either double-tap on either AirPod if you have enabled this gesture, or say “Hey Siri” if you have enabled this feature in your iPhone’s settings. Once activated, you can ask Siri to perform various tasks, such as playing a specific song, making a phone call, or getting directions, all with the convenience of using your AirPods.
5. How do I check the battery level of my AirPods?
You can easily check the battery level of your AirPods on your iPhone. With your AirPods connected, open the Control Center by swiping down from the top-right corner of your iPhone screen. Then, swipe left within the Control Center to access the Now Playing card.
Here, you will see the battery percentage of your AirPods, along with the battery percentage of your iPhone and other connected devices. You can also check the battery level by opening the Batteries widget on your iPhone’s home screen, which provides a detailed view of the battery percentage for all your connected devices.
Changing AirPod settings on your iPhone is easy! Just go to the Settings app.
First, connect your AirPods to your iPhone and open the Settings app. Then, tap on Bluetooth and look for your AirPods in the list. Finally, tap on your AirPods and you can change settings like the name, double-tap function, and microphone.
So now you know, with just a few simple steps, you can customize your AirPod settings to fit your preferences! Enjoy your AirPods!