Looking to free up some storage on your iPhone? Well, you’re in luck! Today, I’ll show you how to archive your photos on your iPhone. So, say goodbye to those pesky storage notifications and keep snapping those precious memories!
Now, you might be wondering, “What’s the difference between archiving and deleting photos?” Great question! Archiving allows you to keep your photos stored in a separate folder without taking up valuable space on your iPhone. It’s like stashing them away in a virtual attic.
So, whether you want to preserve old photos, declutter your camera roll, or simply organize your pictures, archiving is the way to go.
But how exactly do you do it? Don’t worry, I’ve got you covered. In the next few paragraphs, I’ll walk you through the step-by-step process of archiving photos on your iPhone. Let’s get started!
- Open the Photos app on your iPhone.
- Select the photos you want to archive.
- Tap the Share button.
- Scroll down and select “Archive”.
- Your photos are now archived and moved to the Archive folder.
Archiving photos on iPhone is a great way to declutter your camera roll without deleting them. Keep your memories safe and organized with this simple process.
How to Archive Photos on iPhone: A Comprehensive Guide
Welcome to our comprehensive guide on how to archive photos on iPhone! If you’re looking to declutter your camera roll and organize your precious memories, you’ve come to the right place.
In this article, we’ll walk you through the steps and provide you with useful tips to efficiently archive your photos on your iPhone. Let’s get started!
1. Use the Built-In Photos App
The first step to archiving your photos on your iPhone is to utilize the built-in Photos app. This powerful app allows you to easily manage and organize your photo collection.
To begin, open the Photos app on your iPhone and select the photos you want to archive. Once selected, tap the “Share” button and choose the “Archive” option. This will move the selected photos to the “Archive” album, which is accessible in the “Albums” tab of the Photos app.
Archiving your photos in the Photos app provides several benefits. Firstly, archived photos are removed from the main “Photos” tab, reducing clutter and making it easier to navigate through your recent photos.
Secondly, archived photos are still easily accessible in the “Archive” album, ensuring you can view and retrieve them whenever needed. Lastly, archiving is a non-destructive process, meaning that your photos are not deleted but simply organized in a different location.
If you want to unarchive photos, you can simply go to the “Archive” album, select the photos you want to unarchive and tap the “Share” button followed by the “Unarchive” option. The photos will then be restored to their original location in the “Photos” tab.
2. Utilize iCloud Photo Library
If you’re looking for a more advanced and convenient way to archive your photos, consider using the iCloud Photo Library. This feature allows you to seamlessly sync and store your photos across all your Apple devices, providing you with easy access to your entire photo collection.
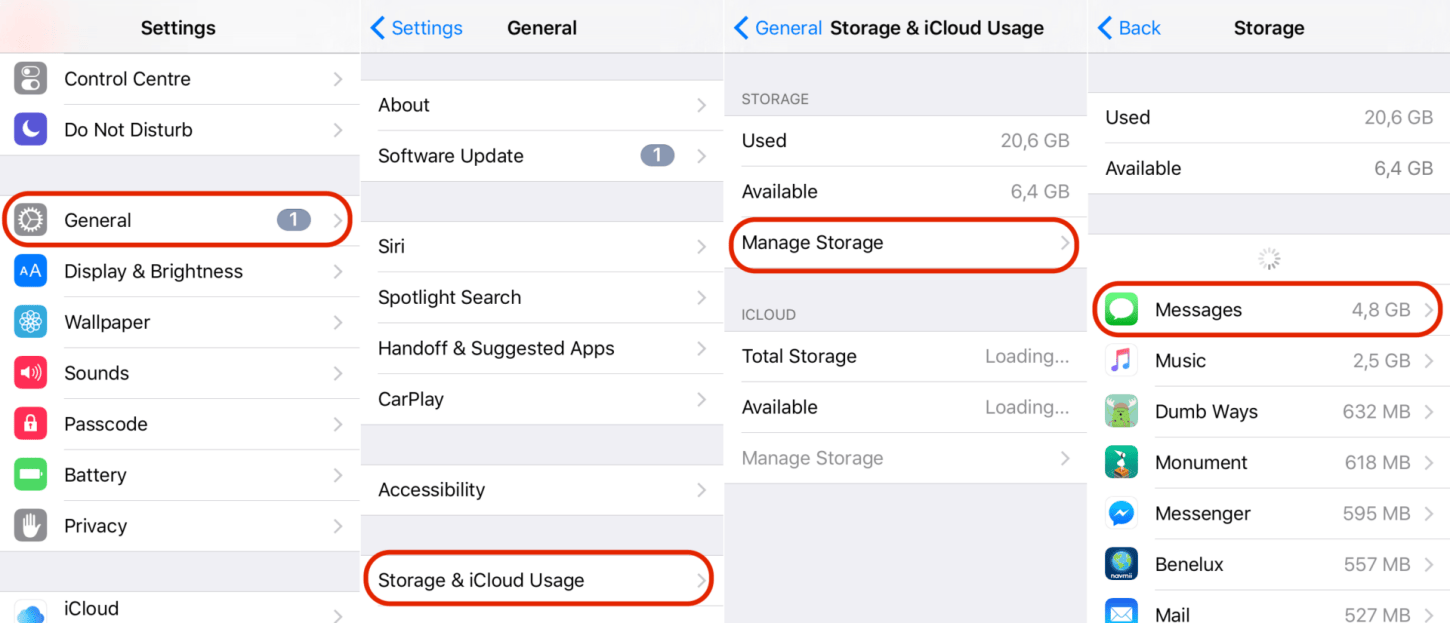
To enable iCloud Photo Library, go to the “Settings” app, tap your Apple ID at the top of the screen, select “iCloud”, and toggle on the “Photos” option.
Once iCloud Photo Library is enabled, every photo you take or import on any of your Apple devices will automatically be uploaded to iCloud and synced across all your devices.
This means that even if you delete a photo from your iPhone, it will still be archived and accessible from other devices with iCloud Photo Library enabled.
Enabling iCloud Photo Library offers numerous benefits for archiving photos on your iPhone. Your photos are securely backed up to the cloud, protecting them against loss or device damage.
Additionally, you have the option to optimize storage on your iPhone, which will automatically replace full-resolution photos with smaller versions to save space. You can still access the original, full-resolution photos whenever you need them.
3. Take Advantage of Third-Party Applications
While the built-in Photos app and iCloud Photo Library are powerful tools for archiving photos on iPhone, there are also third-party applications available that offer additional features and functionalities. These apps often provide advanced organization options, editing tools, and backup solutions.
A popular third-party app for photo archiving is Google Photos. This app offers unlimited, free storage for high-quality photos and allows you to easily search and organize your collection.
Another option is Adobe Lightroom, which not only provides robust editing capabilities but also offers cloud storage for your photos.
When choosing a third-party app, make sure to read reviews, compare features, and consider your specific archiving needs. Be mindful of any potential costs associated with additional storage or premium features.
4. Create Folders and Albums
Another effective way to archive your photos on iPhone is by creating folders and albums. This allows you to manually organize your photos into specific categories or themes, making it easier to locate them in the future.
To create a folder or album, open the Photos app and go to the “Albums” tab. Tap the “+” button and choose either “New Folder” or “New Album”. You can then name the folder or album and add photos to it.
Organizing your photos into folders and albums offers great flexibility in how you archive and manage your collection. You can create folders based on events, vacations, or people, and then create albums within those folders to further categorize your photos. For example, you can have a “Vacation” folder with separate albums for each vacation destination.
To keep your folders and albums organized, you can rearrange them by tapping “Edit” in the “Albums” tab and dragging them into the desired order. This allows for a personalized and efficient archiving system that suits your preferences.
5. Regularly Back Up Your Photos
When archiving your photos on an iPhone, it’s crucial to regularly back up your photo collection to ensure they are safe and protected.
Backup options include iCloud, iTunes, or third-party cloud storage solutions such as Google Drive or Dropbox. Regularly backing up your photos provides an extra layer of security against accidental deletions, device malfunctions, or loss of your iPhone.
To back up your photos to iCloud, make sure iCloud Backup is enabled in the “Settings” app under your Apple ID’s “iCloud” settings. Your photos will be included in the automatic iCloud backups. Alternatively, you can connect your iPhone to your computer and use iTunes to manually back up your photos and other data.
Remember to also keep an external backup of your photos on a computer, external hard drive, or cloud storage service. This ensures that even if something were to happen to your iPhone and iCloud, your photos would still be accessible and safely archived.
6. Clean Up and Delete Unwanted Photos
Last but not least, as you continue to archive your photos on your iPhone, it’s important to periodically clean up and delete unwanted photos. This helps to prevent your photo collection from becoming overwhelming and allows you to focus on the memories that truly matter to you.
When cleaning up your photos, consider removing duplicates, blurry shots, screenshots, or photos that no longer hold significant meaning.
The Photos app offers a “Recently Deleted” album where deleted photos are stored for 30 days before being permanently deleted. This provides a safety net in case you accidentally delete a photo and need to retrieve it.
To delete photos, simply select the photos you want to remove, tap the trash bin icon, and confirm the deletion. It’s a good practice to regularly perform this clean-up process, keeping your photo library organized and clutter-free.
Frequently Asked Questions
When it comes to archiving photos on your iPhone, you may have a few questions. Check out the answers below to help you make the most of your photos.
1. How can I archive photos on my iPhone?
To archive photos on your iPhone, you can use the built-in Photos app. Simply select the photos you want to archive, tap on the share button, and choose “Archive” from the options.
This will move the selected photos to the “Archived” album, where they will be organized separately from your main photo library. Archiving photos allows you to declutter your photo library without deleting the images.
Archived photos will still be accessible and can be restored to your main photo library at any time. To access your archived photos, go to the Albums tab in the Photos app and look for the “Archived” album. From there, you can view, restore, or delete archived photos as needed.
2. Can I archive multiple photos at once?
Yes, you can archive multiple photos at once on your iPhone. In the Photos app, tap on the “Select” button in the top-right corner, then use your finger to tap and drag across the photos you want to archive. You can also tap on individual photos to select or deselect them.
Once you have selected all the photos you want to archive, tap on the share button and choose “Archive” from the options.
This method allows you to quickly archive multiple photos, making it easier to declutter and organize your photo library. Remember, archived photos will not be deleted; they will simply be moved to the “Archived” album.
3. Will archiving photos free up space on my iPhone?
No, archiving photos on your iPhone will not free up space on your device. When you archive a photo, it is simply moved to a separate album within the Photos app.
The archived photos still take up storage space on your iPhone. If you’re looking to free up storage space, you may need to consider deleting photos or transferring them to a computer or cloud storage.
However, archiving photos can help you organize your photo library and make it easier to find your most important or frequently accessed photos. It’s a useful tool for decluttering without permanently deleting photos.
4. Can I archive photos and videos together?
Yes, you can archive both photos and videos together on your iPhone. The process is the same for both types of media. In the Photos app, select the photos and videos you want to archive, tap on the share button, and choose “Archive” from the options. The selected items will then be moved to the “Archived” album.
By archiving both photos and videos together, you can keep your media organized and easily accessible in one place. Remember to regularly review your archived items and decide if you want to restore them or delete them to free up space.
5. Can I access my archived photos on other devices?
Yes, you can access your archived photos on other devices that are connected to your iCloud account. The “Archived” album is synced across all your devices, including iPhones, iPads, and Macs.
This means that any photos you archive on one device will be accessible in the “Archived” album on all your other devices.
This syncing feature allows you to easily access and manage your archived photos no matter which device you’re using. Simply open the Photos app on your other devices and look for the “Archived” album to access your archived photos.
So, now you know how to archive photos on your iPhone. First, go to the Photos app and select the photos you want to archive.
Then, tap on the share icon, choose the “Archive” option, and you’re done! These archived photos won’t clutter your main photo library, but you can still find them in the Archive folder. It’s a simple way to keep your photos organized and easy to find.
Remember to regularly review your archived photos and decide if you still want to keep them. Don’t forget, that archiving photos is different from deleting them. So, enjoy organizing your photos and giving your iPhone’s memory some breathing space!