Are you a Mac user looking to add a wireless printer to your device? You’ve come to the right place! Adding a wireless printer to your Mac is easier than you might think. In just a few simple steps, you’ll be able to print wirelessly from your Mac in no time. Let’s dive in and explore how to make this happen!
First things first, make sure your wireless printer is compatible with your Mac. Check the manufacturer’s website or user manual for compatibility information. Once you’ve confirmed compatibility, it’s time to get started. We’ll walk you through the process step by step, so don’t worry if you’re not tech-savvy!
Ready to begin? Great! In the following paragraphs, we’ll guide you through the setup process, including connecting your printer to your Wi-Fi network and adding it to your Mac. So, grab your Mac and let’s get started on adding that wireless printer!

How to Add a Wireless Printer to Mac: A Comprehensive Guide
Here is a video that shows how you can add your printer to a Mac. After this video you will find the steps to do this process.
To connect a printer to a Mac here are the steps:
- Make sure your wireless printer is turned on and connected to the same Wi-Fi network as your Mac.
- On your Mac, click the Apple menu and select “System Preferences.”
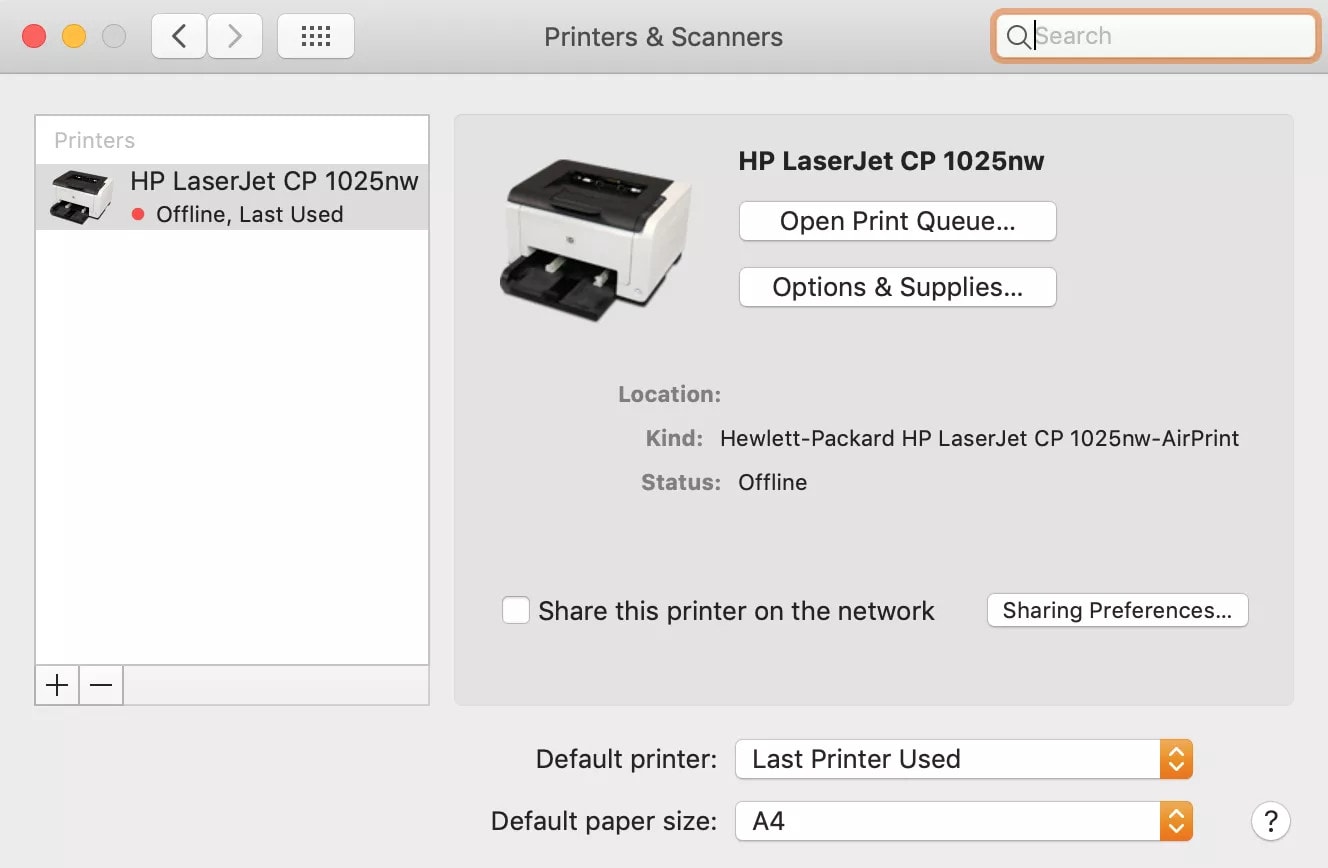
- Choose “Printers & Scanners” from the preferences window.
- Click the “+” button to add a new printer.
- Your Mac will automatically search for available printers. Select your wireless printer from the list.
- Follow any additional prompts to complete the setup.
Now I am going to explain all the steps one by one so you don’t have any confusion regarding this process.
Setting Up Your Wireless Printer on a Mac
Before we dive into the details, let’s start by understanding the basics of connecting a wireless printer to your Mac. This section will cover everything from checking compatibility to connecting to your Wi-Fi network. So grab your Mac, follow along, and let’s get started!
Step 1: Check the Compatibility
The first step in adding a wireless printer to your Mac is to check the compatibility between the two devices. Not all printers are designed to work with Mac computers, so it’s essential to ensure that your printer is Mac-compatible. Check the printer’s manual or visit the manufacturer’s website to verify compatibility. If your printer is not compatible with Mac, you may need to consider purchasing a new one.
Once you’ve confirmed compatibility, gather the necessary information about your printer, including the model number and any specific instructions provided by the manufacturer.
Tip: If you’re unsure about the compatibility or need assistance, reach out to the printer manufacturer’s customer support for guidance.
Step 2: Connect to Your Wi-Fi Network
In order to use a wireless printer, your Mac needs to be connected to the same Wi-Fi network as the printer. If you’re already connected to your home or office Wi-Fi, you’re good to go. However, if you’re not connected to a network or are using a different Wi-Fi network, follow these steps to connect:
- Click on the Wi-Fi icon on the top-right corner of your Mac’s screen.
- Select your Wi-Fi network from the list of available networks.
- Enter the network password, if prompted, and click “Join.”
- Wait for your Mac to connect to the Wi-Fi network.
Once connected to the Wi-Fi network, your Mac will be able to communicate with the wireless printer.
Step 3: Install Printer Software
To enable your Mac to communicate with the wireless printer, you’ll need to install the necessary printer software. Most modern printers come with a Installation CD or a downloadable software package from the manufacturer’s website. Follow these steps to install the software:
- Insert the Installation CD provided with your printer into your Mac, or download the software package from the manufacturer’s website.
- Follow the instructions provided by the software installer to complete the installation process.
- Restart your Mac, if prompted, to ensure that the printer software is properly installed.
Once the printer software is installed, your Mac will recognize the wireless printer and allow you to print directly from your Mac.
Additional Tips for Setting Up a Wireless Printer on Mac
Now that you have the basic steps to set up a wireless printer on your Mac, here are some additional tips to ensure a smooth and successful setup:
- Ensure that your Mac’s operating system is up to date by installing the latest software updates.
- If your wireless printer supports AirPrint, you can print directly from your Mac without the need for additional software installation. Simply select the printer from the list of available printers when printing a document.
- If you experience any issues during the setup process, consult the printer’s manual, visit the manufacturer’s website, or reach out to their customer support for assistance.
- Remember to keep your printer and Mac’s firmware updated to ensure compatibility and smooth operation.
- Consider exploring additional features and functionalities offered by your wireless printer, such as scanning, copying, and mobile printing.
Troubleshooting Common Issues
Even with the best setup instructions, it’s not uncommon to encounter some issues when adding a wireless printer to your Mac. In this section, we will discuss some common problems and provide troubleshooting tips to help you resolve them.
Issue 1: Printer Not Found
If your Mac is unable to find the wireless printer during the setup process, here are a few steps you can try:
- Ensure that the printer is turned on and connected to the same Wi-Fi network as your Mac.
- Restart your Mac and the printer to refresh their network connections.
- Double-check your Wi-Fi network settings on both your Mac and printer to ensure they are correctly configured.
- If available, try connecting the printer to your Mac using a USB cable to establish a direct connection. This can help troubleshoot any wireless communication issues.
Issue 2: Unable to Print
If you’re experiencing difficulties printing from your Mac to the wireless printer, try the following troubleshooting steps:
- Verify that the printer is turned on and connected to the Wi-Fi network.
- Check the printer’s paper tray and ink levels to ensure they are not empty.
- Make sure that the printer is set as the default printing device on your Mac. You can check this in the Printers & Scanners settings.
- Restart your Mac and the printer to refresh their connections.
- If the above steps don’t work, remove the printer from your Mac’s Printers & Scanners settings and add it again using the steps outlined in the previous sections.
Issue 3: Slow Printing or Print Quality Issues
In cases where the printing process is slow or the print quality is not satisfactory, consider the following troubleshooting steps:
- Make sure that your wireless printer has a stable and strong Wi-Fi connection. Position the printer closer to your Wi-Fi router or consider using a Wi-Fi repeater to improve the signal.
- Check the printer’s settings to ensure that the print quality is set to the desired level. Adjust any settings that may affect print speed or print quality.
- If the printouts are blurry or inconsistent, clean the printer heads or replace the ink cartridges.
- Try printing a test page to see if the issue persists. If it does, consult the printer’s manual or reach out to the manufacturer’s customer support for further assistance.
The Benefits of Wireless Printing on Mac
Now that you know how to add a wireless printer to your Mac, let’s take a moment to explore the benefits of wireless printing:
- Convenience: With wireless printing, you can print from anywhere within the range of your Wi-Fi network, eliminating the need for cables and making printing more convenient.
- Flexibility: Wireless printing allows you to print from multiple devices, such as your Mac, iPhone, or iPad, without the need to switch cables or connect each device individually.
- Reduced Clutter: Without the need for physical connections, wireless printing helps reduce cable clutter around your workspace.
- Easy Sharing: With a wireless printer, you can easily share printing capabilities with other users on the same Wi-Fi network, making it ideal for homes or small offices.
- Print Anywhere: Wireless printing enables you to print from any room in your home or office, giving you more flexibility and freedom.
By now, you should have a solid understanding of how to add a wireless printer to your Mac. We covered everything from checking compatibility to troubleshooting common issues that you may encounter along the way. Remember to follow the instructions provided by the printer manufacturer for the best results, and don’t hesitate to seek assistance if needed.
With a wireless printer connected to your Mac, you can enjoy the convenience and flexibility of wireless printing, making your printing tasks easier and more efficient. So go ahead and set up your wireless printer on your Mac, and start printing hassle-free!
1. How can I find the name and model of my wireless printer?
The name and model of your wireless printer can usually be found on the printer itself or in the printer’s documentation. Look for labels or a sticker on the printer that displays this information. If you can’t find it physically, you may also be able to access this information through the printer’s software on your computer.
For example, on a Mac, you can go to the “System Preferences” and navigate to the “Printers & Scanners” section. Select your printer from the list, and the name and model should be displayed there. It’s important to know the name and model of your printer as it can help you identify the correct drivers and software to install.
2. What are the steps to connect a wireless printer to my Mac?
Connecting a wireless printer to your Mac involves a few simple steps:
Step 1: Make sure your printer is turned on and connected to the same Wi-Fi network as your Mac.
Step 2: On your Mac, go to “System Preferences” and select “Printers & Scanners.”
Step 3: Click on the “+” button to add a new printer.
Step 4: Your Mac will search for available printers. Select your wireless printer from the list.
Step 5: Follow any on-screen instructions to complete the setup process.
Once the setup is complete, you should be able to print wirelessly from your Mac to the connected printer.
3. Do I need to install any drivers or software for my wireless printer?
Typically, you will need to install the necessary drivers and software for your wireless printer on your Mac. These drivers and software allow your Mac to communicate with the printer and enable all the available features.
Most modern wireless printers come with a setup CD or DVD that includes the required drivers and software. You can insert this disc into your Mac and follow the on-screen instructions to install them. Alternatively, you can visit the manufacturer’s website and download the latest drivers and software from there.
Make sure to download the drivers and software specific to your printer’s make and model to ensure compatibility and optimal performance.
4. Can I connect multiple wireless printers to my Mac?
Yes, you can connect multiple wireless printers to your Mac, as long as they are all on the same Wi-Fi network. When you go through the setup process to add a new printer, your Mac will detect all available printers on the network. You can select and add multiple printers to your Mac, allowing you to print to different printers depending on your needs.
Keep in mind that each printer may have its own separate settings and features, so make sure to select the correct printer when printing a document or photo.
5. How do I troubleshoot common issues when adding a wireless printer to my Mac?
If you encounter any issues while adding a wireless printer to your Mac, try the following troubleshooting steps:
1. Double-check that your printer is turned on and connected to the same Wi-Fi network as your Mac.
2. Restart both your printer and your Mac to refresh the connections.
3. Make sure you have installed the correct drivers and software for your printer.
4. Ensure that there are no software conflicts or compatibility issues between your Mac and the printer.
If these steps do not resolve the issue, consult the printer’s manual or contact the manufacturer’s support for further assistance.
Setting up a wireless printer on your Mac is easy! Follow these simple steps to get started: First, make sure your printer is compatible with your Mac.
Then, connect your printer to your Wi-Fi network. Next, add the printer to your Mac by going to the “System Preferences” and selecting “Printers & Scanners.” Finally, click the “+” button and choose your printer from the list. That’s it! Now you can enjoy the convenience of printing wirelessly from your Mac.
Remember to keep your printer and Mac connected to the same Wi-Fi network for seamless printing. If you encounter any issues, consult the printer’s manual or contact the manufacturer for further assistance. Enjoy your wireless printing experience!