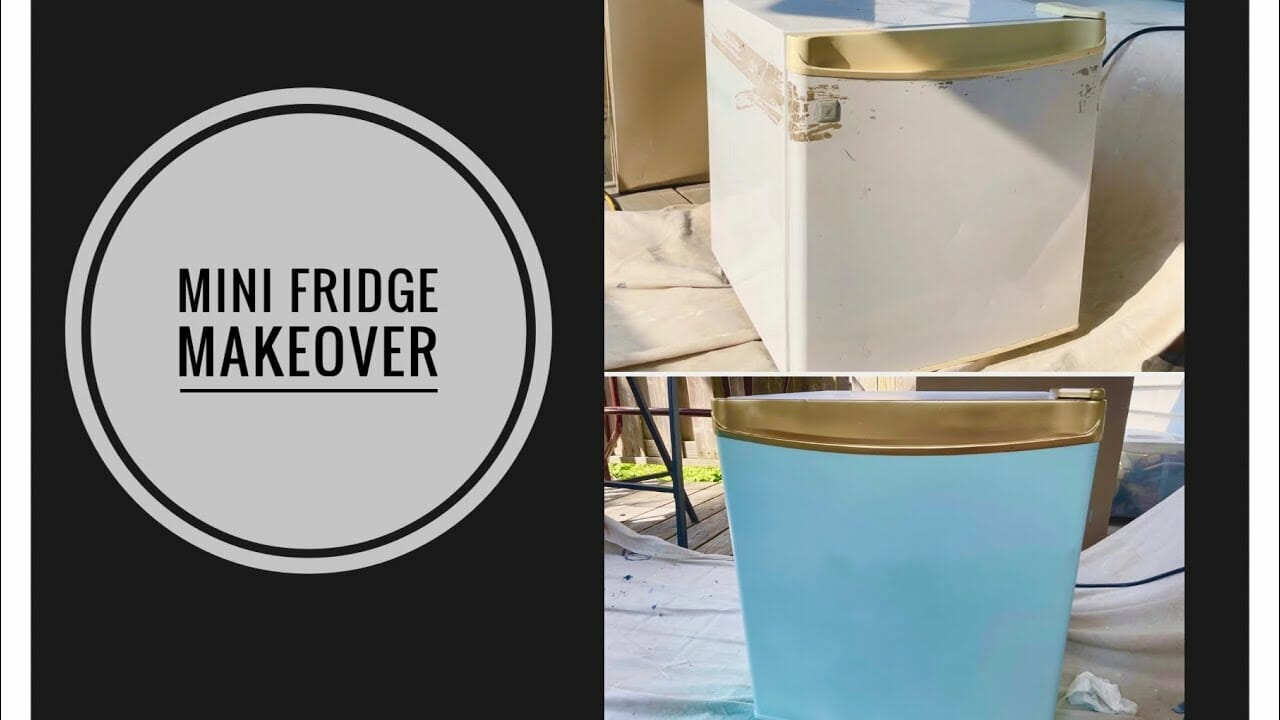
Can you paint a mini fridge? It’s a question that might have crossed your mind if you’re looking to add some personal flair to your compact cooling companion. Well, you’re in luck! In this article, we’ll explore the exciting world of mini fridge customization and discover how you can transform your plain mini fridge into a unique work of art. So, grab your paintbrush and let’s dive in!
You might be wondering why anyone would want to paint a mini fridge in the first place. Well, the answer is simple – personalization! Painting a mini fridge allows you to express your creativity and add a touch of personality to your space. Whether you want to match the fridge to your room’s decor or showcase your favorite artwork, the possibilities are endless. So, let’s explore the different painting options and get ready to unleash your inner artist!
Now, you might be thinking, “But wait, can you really paint a mini fridge without damaging it?” Absolutely! With the right preparation and techniques, you can paint a mini fridge without compromising its functionality. From selecting the right paint type to properly cleaning and priming the surface, we’ll guide you through each step to ensure a successful painting project. So, get ready to turn your mini fridge into a stunning masterpiece that showcases your style and creativity!
- Clean the surface of the mini fridge thoroughly.
- Sand the fridge to create a smooth surface.
- Apply a primer to help the paint adhere.
- Choose your desired paint color and apply 2-3 coats, allowing each layer to dry.
- Finish with a clear sealant to protect the paint.
Give your mini fridge a unique look with a touch of paint!

Can You Paint A Mini Fridge?
Mini fridges have become a popular appliance for dorm rooms, offices, and small spaces. They are not only functional but also offer an opportunity to showcase your personal style. One question that often arises is whether it’s possible to paint a mini fridge. In this article, we will explore the answer to this question, discuss the process of painting a mini fridge, and provide tips and precautions to keep in mind. So, if you’re looking to add a touch of creativity to your mini fridge, keep reading!
The Basics: Can You Paint a Mini Fridge?
Yes, you can paint a mini fridge! Painting a mini fridge can be a fun and creative way to personalize your space. However, it’s important to approach the task with proper preparation and the right materials to ensure a successful outcome. Keep in mind that painting a mini fridge is a DIY project that may void the manufacturer’s warranty. Before you start, double-check your warranty information to make an informed decision.
If you’re ready to proceed, here’s a step-by-step guide on how to paint your mini fridge:
- Prepare the surface: Clean the mini fridge thoroughly to remove any dirt, grease, or stickers. Use warm soapy water and a non-abrasive sponge to scrub the surface. Rinse with clean water and dry it completely.
- Sand the surface: Lightly sand the surface of the mini fridge to create a rough texture that will help the paint adhere better. Use a fine-grit sandpaper and make sure to wipe away any dust afterward.
- Prime the surface: Apply a coat of primer to the entire surface of the mini fridge. This will help the paint adhere better and provide a smooth base for your desired color.
- Paint the mini fridge: Once the primer is dry, you can start painting. Use a high-quality acrylic or enamel paint that is suitable for metal surfaces. Apply thin and even coats, allowing each coat to dry before adding the next one. This will help prevent brush strokes or drips.
- Allow for proper drying time: After you’ve finished painting, make sure to allow the mini fridge to dry completely before using it. This can take anywhere from 24 to 48 hours, depending on the type of paint used and the environmental conditions.
By following these steps, you can transform your mini fridge into a unique and eye-catching piece that reflects your personal style and decor.
Tips and Precautions for Painting a Mini Fridge
While painting a mini fridge can be a fun project, there are a few tips and precautions you should keep in mind:
- Choose the right paint: Make sure to select a paint that is suitable for metal surfaces and is designed to withstand temperature changes. This will ensure the longevity of your painted mini fridge.
- Proper ventilation: When painting, make sure to work in a well-ventilated area to avoid inhaling fumes. Open windows or use a fan to circulate the air.
- Take your time: Rushing the painting process can result in an uneven finish or paint drips. Be patient and allow each coat to dry properly before applying more paint.
- Protect the interior: It’s important to tape off or cover the interior of the mini fridge before painting to protect it from any accidental spills or paint damage.
- Consider the color: Darker colors may absorb more heat from the mini fridge’s compressor, potentially affecting its performance. If you live in a warm climate or plan to use the mini fridge for storing perishable items, it’s advisable to choose lighter colors.
- Maintain the paint: Once you’ve painted your mini fridge, take care to clean it gently with a soft cloth or sponge. Avoid harsh abrasives or scrubbing that could damage the paint.
By following these tips and taking the necessary precautions, you can achieve a professional-looking paint job on your mini fridge and enjoy the creative results.
Benefits of Painting a Mini Fridge
Painting a mini fridge offers several benefits:
- Personalization: Painting your mini fridge allows you to express your style and make it stand out from the crowd.
- Cost-saving: If you already have a mini fridge and want to update its look, painting it is a budget-friendly option compared to purchasing a new one.
- Customization: Whether you want to match the color scheme of your room or create a unique design, painting a mini fridge gives you the freedom to customize it according to your preferences.
With these benefits in mind, painting a mini fridge can be a rewarding and creative project that adds a touch of personality to your living space.
Additional Information
What Paint Should You Use?
Can You Use Spray Paint on a Mini Fridge?
How to Properly Prep the Surface?
In conclusion, painting a mini fridge is indeed possible and can be a fun and rewarding DIY project. By following the correct steps, using the proper materials, and taking necessary precautions, you can transform your mini fridge into a unique and eye-catching appliance that reflects your personal style. Remember to choose the right paint, prepare the surface properly, and allow for proper drying time. With a little patience and creativity, you can give your mini fridge a fresh new look!
#Key Takeaways: Can You Paint A Mini Fridge?
- Yes, you can paint a mini fridge to give it a fresh look.
- Before painting, clean the fridge thoroughly to remove any dirt or grease.
- Use a primer specifically designed for metal surfaces to ensure good adhesion.
- Choose high-quality paint suitable for appliances and apply it in thin, even coats.
- Allow the paint to dry completely before using the fridge again.
Frequently Asked Questions
Have you ever wondered if it’s possible to give your mini fridge a makeover? Painting a mini fridge can be a fun and creative way to personalize it and match your decor. Here are some commonly asked questions about painting a mini fridge:
1. Can I paint my mini fridge any color I want?
Absolutely! When it comes to painting your mini fridge, the color options are endless. You can choose any color or combination of colors that you desire to make your mini fridge truly unique. Whether you want a vibrant pop of color or a more subtle and sophisticated look, the choice is yours.
To ensure a successful paint job, it’s important to use the right type of paint for your mini fridge’s surface. Acrylic or enamel paints work well for this project, as they adhere easily and provide a durable finish. Remember to properly prepare and prime the surface before painting to achieve the best results.
2. Do I need to remove the doors and handles before painting?
In most cases, it’s recommended to remove the doors and handles before painting a mini fridge. This allows for easier access to all the nooks and crannies, ensuring even coverage and a professional-looking finish. You can easily unscrew the handles and detach the doors following the manufacturer’s instructions.
If removing the doors and handles seems like a daunting task, you can still paint your mini fridge while they’re attached. However, it may require more patience and precision to achieve a seamless look. Just be sure to tape off any areas you don’t want to paint, such as the handles or the rubber gaskets, to prevent paint from getting on them.
3. Can I use regular spray paint to paint my mini fridge?
While regular spray paint can be used for certain DIY projects, it may not be the best option for painting a mini fridge. Mini fridges have a smooth, glossy surface that can be challenging for regular spray paint to adhere to. Additionally, regular spray paint may not provide the durability you need on a frequently used appliance.
Using specialty paints, such as appliance epoxy spray paint, is a better choice. These paints are specifically formulated to bond well with metal surfaces, like those found on mini fridges. They also provide a protective coating that can withstand daily wear and tear. Remember to follow the manufacturer’s instructions for the best results.
4. How long does the paint on a mini fridge take to dry?
The drying time for the paint on a mini fridge can vary depending on various factors, such as the type of paint used, the number of coats applied, and the environmental conditions. In general, it’s best to wait at least 24 hours before touching or moving your mini fridge to allow the paint to fully cure.
Keep in mind that different layers of paint may have different drying times. Follow the instructions provided by the paint manufacturer to ensure the proper drying and curing times. Patience is key to achieving a professional-looking finish.
5. Can I use decals or stickers on my painted mini fridge?
Absolutely! Using decals or stickers on your painted mini fridge is a great way to add additional personalization and flair. They can be easily applied to the painted surface and come in a wide variety of designs, patterns, and themes. You can find decals or stickers that match your style and interests.
Just make sure to apply the decals or stickers after the paint has completely dried and cured. This will help ensure that they adhere properly to the surface without causing any damage or peeling. Additionally, if you decide to remove the decals or stickers in the future, they should come off without damaging the paint underneath.
Summary
So, can you paint a mini fridge? The answer is yes! With a little preparation and the right materials, you can give your mini fridge a fresh new look.
First, make sure to clean and dry the surface of the fridge before painting. Then, use a paint primer specifically made for metal surfaces to ensure the paint adheres properly. Finally, choose a paint color or design that suits your style and carefully apply it to the fridge using a brush or spray paint.
Remember to let the paint dry completely before using the fridge again. With a little creativity and effort, you can transform your mini fridge into a unique and personalized piece that adds a pop of color to your space.