If you’ve ever wondered how to remove a hard drive from a laptop, you’ve come to the right place! In this guide, we’ll walk you through the step-by-step process that even a tech newbie can follow. So, let’s dive in and unlock the secrets of removing a hard drive from your laptop!
Now, you might be thinking, “Why would I want to remove a hard drive?” Well, there are a few reasons! Maybe you want to upgrade to a bigger and faster hard drive or switch to a more efficient solid-state drive (SSD). Or perhaps you just need to replace a faulty hard drive.
Whatever your reason, we’ve got you covered with easy-to-understand instructions.
Don’t worry if you’re not a computer expert – we’ll break it down into simple, manageable steps. Grab your laptop and let’s get started on this awesome DIY adventure!
How to Remove a Hard Drive From a Laptop?
Here is a guide to remove the hard drive from your laptop,
- Shut down your laptop and unplug it from the power source.
- Remove the laptop’s battery, if possible.
- Locate the hard drive compartment, usually on the bottom of the laptop.
- Unscrew the screws securing the compartment and lift it open.
- Disconnect the cables and gently remove the hard drive.
Remember to handle the hard drive with care to avoid damage. Happy upgrading!
Gathering the Required Tools and Preparing the Laptop
Before you remove the hard drive from your laptop, it is important to have the necessary tools and create a suitable workspace. Here’s what you’ll need:
Tools Needed:
1. Screwdriver set (typically a Phillips-head screwdriver)
2. Anti-static wrist strap
3. Replacement hard drive (if you’re planning to upgrade or replace it)
4. External hard drive enclosure (if you want to use the old hard drive externally)
5. USB cable (if using an external hard drive enclosure)
Preparing the Workspace:
1. Choose a clean, well-lit, and static-free workspace.
2. Power down your laptop and unplug it from any power source.
3. Remove the laptop’s battery to prevent any accidental power supply.
Removing the Back Cover and Locating the Hard Drive
Now that you have prepared the necessary tools and workspace, it’s time to remove the back cover and locate the hard drive. Follow these steps:
Step 1- Identify the Back Cover:
Most laptops have a specific panel on the bottom that houses the hard drive and other components. Look for a panel with small screws that is easily accessible.
Step 2- Unscrew the Screws:
Using the appropriate screwdriver, carefully unscrew the screws holding the back cover in place. Keep the screws in a safe place to prevent them from getting lost.
Step 3- Remove the Back Cover:
Gently lift the back cover away from the laptop, revealing the internal components. Set the cover aside in a safe place.
Step 4- Locate the Hard Drive:
Once the back cover is removed, you will be able to see the internal components of your laptop. Look for the hard drive, which is a rectangular metal or plastic box connected to the motherboard. It may be held in place with screws or brackets.
Removing the Hard Drive from the Laptop
Now that you have located the hard drive, it’s time to disconnect it from the laptop. Carefully follow these steps:
Step 1- Disconnect the Cables:
Before removing the hard drive, it is crucial to disconnect any cables connected to it. These cables include the data cable (SATA or IDE) and the power cable. Gently pull out the cables without applying excessive force.
Step 2- Remove Screws or Brackets:
If the hard drive is held in place with screws or brackets, carefully remove them using the appropriate screwdriver. Set the screws or brackets aside in a safe place.
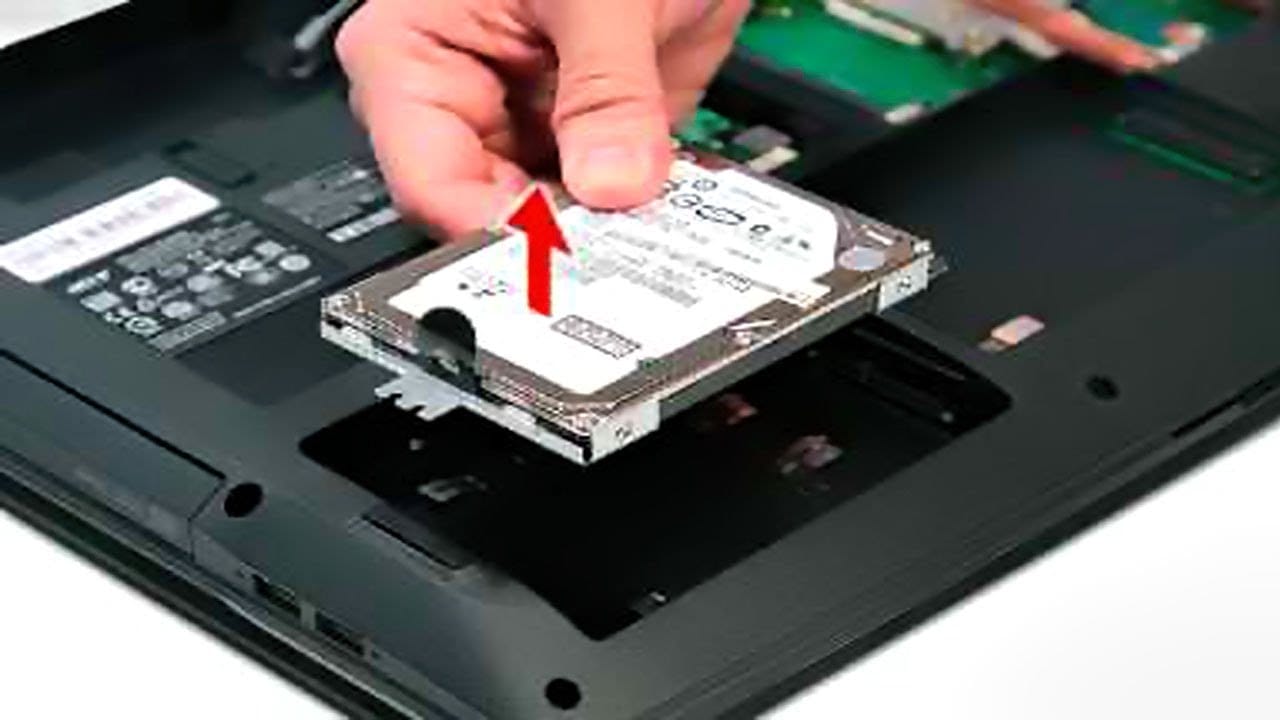
Step 3- Slide Out the Hard Drive:
After disconnecting the cables and removing any screws or brackets, you can now slide out the hard drive from its slot. Hold the hard drive by its sides and gently pull it straight out. Be cautious not to tug on any cables or components in the process.
Optional: Using an External Hard Drive Enclosure
If you want to continue using the old hard drive as an external storage device, you can place it in an external hard drive enclosure. Follow these steps:
Step 1- Purchase an External Hard Drive Enclosure:
Select an external hard drive enclosure that matches the size and interface of your old hard drive. SATA or IDE are the most common interfaces.
Step 2- Insert the Hard Drive into the Enclosure:
Open the enclosure and carefully insert the hard drive into the designated slot. Make sure it is properly aligned and secure.
Step 3- Secure the Enclosure:
Screw the enclosure shut or secure it using any provided clips. Connect the USB cable to the enclosure and the other end to your laptop or computer.
Removing a hard drive from a laptop is a straightforward process that requires careful handling and the right tools. By following the step-by-step instructions provided in this article, you can safely remove the hard drive from your laptop and proceed with any upgrades or replacements.
Remember to handle the components with caution and store the screws in a secure place. Whether you’re upgrading your laptop’s storage or salvaging data from a faulty hard drive, knowing how to remove it is an essential skill for any laptop user. Good luck!
Frequently Asked Questions
Welcome to our FAQ section where we provide answers to common inquiries about removing a hard drive from a laptop. Whether you’re looking to upgrade your storage or replace a faulty hard drive, this guide will help you successfully remove the hard drive from your laptop.
1. Can I remove the hard drive from my laptop on my own?
Absolutely! Removing a hard drive from a laptop is a relatively straightforward process. With the right tools and a little bit of patience, you can safely remove the hard drive without any professional assistance.
However, it’s essential to keep in mind that different laptop models may have different procedures. Therefore, it’s always recommended to consult your laptop’s user manual or search for specific instructions online before attempting a hard drive removal.
2. What tools do I need to remove the hard drive from my laptop?
To remove the hard drive from your laptop, you will typically need a few basic tools. Most importantly, you’ll require a screwdriver that matches the size and type of screws holding your laptop’s back panel or hard drive enclosure in place.
You may also need an anti-static wristband to prevent static electricity from damaging sensitive internal components. Additionally, having a clean, static-free surface to work on, such as an anti-static mat, is highly recommended.
3. How do I determine which screws to remove to access the hard drive?
This process largely depends on the laptop model you own. In general, you’ll need to remove the back panel or bottom cover of your laptop. The hard drive is often located near the center or side, secured by a few screws or in a removable drive bay.
Once you have removed the necessary screws and accessed the hard drive compartment, you may need to unscrew any screws or connectors that are securing the hard drive to the laptop’s chassis. Again, referring to your laptop’s user manual or searching online for specific instructions will give you accurate guidance.
4. How can I ensure the safety of my data before removing the hard drive?
Prior to removing the hard drive, it is essential to back up your data to ensure you don’t lose any important files. You can transfer your files to an external storage device like a USB flash drive, external hard drive, or cloud storage. This way, you can easily access your data once you install a new hard drive.
If your hard drive is not functioning correctly, and you cannot access your files, you may need to consult a professional data recovery service to retrieve your data before proceeding with the hard drive removal process.
5. What precautions should I take while removing the hard drive?
When removing the hard drive from your laptop, it is crucial to handle the components with care and avoid any static electricity discharge. This means grounding yourself by using an anti-static wristband and working on an anti-static mat or clean, non-static surface.
Additionally, ensure your laptop is powered off and disconnected from any power sources before beginning the removal process. Take note of the location of each screw you remove to avoid confusion when reassembling the laptop. Keep screws organized and remember to follow the reverse order when putting everything back together.
Removing a hard drive from a laptop is a relatively simple process. First, gather the necessary tools like a screwdriver. Then, locate the hard drive compartment on the laptop and remove the cover. Disconnect the cables connected to the hard drive and remove any screws securing it. Finally, gently slide out the hard drive and replace it if necessary.
Remember to handle the hard drive carefully and avoid unnecessary force. Consult the laptop’s user manual or seek professional help if you are unsure about any steps. By following these instructions, you can successfully remove a hard drive from a laptop and potentially upgrade or replace it with ease.