HTML paragraphs play a crucial role in structuring and organizing content on a webpage. By using the <p> tag, you can define and display paragraphs of text. In this comprehensive guide, we will explore the various aspects of HTML paragraphs and their implementation. Whether you’re a beginner or an experienced web developer, this article will equip you with the knowledge to create effective paragraphs in HTML.
What is an HTML Paragraph?
In HTML, a paragraph is a block-level element that is used to represent a section of text. It is denoted by the <p> tag and has both an opening and closing tag. Anything placed between these tags is treated as a paragraph. While some browsers may interpret a line as a paragraph even without the closing tag, it is considered a good practice to always use the closing tag to avoid unexpected results.
Syntax of the <p> tag
The syntax for creating a paragraph in HTML is simple and straightforward. It follows the pattern <p>Content</p>, where “Content” represents the text or content of the paragraph.
2. Importance of Using the Closing Tag
Using the closing tag </p> is essential when creating paragraphs in HTML. While some browsers may still render the paragraph correctly without the closing tag, omitting it can lead to unexpected formatting issues. To ensure consistent and proper rendering across different browsers and to follow best practices, it is recommended to always use the closing tag.
3. Basic Implementation of HTML Paragraphs
Creating a Simple Paragraph
Let’s start with a basic example of creating a paragraph in HTML:
<!DOCTYPE html>
<html>
  <body>
    <h2>Welcome To My Website</h2>
    <p>This is a sample paragraph.</p>
  </body>
</html>
In this example, we have a simple HTML structure with a heading and a paragraph. The paragraph is enclosed within the <p> tags. When rendered in a browser, the text “This is a sample paragraph.” will be displayed as a paragraph.
Multiple Paragraphs
HTML allows for the inclusion of multiple paragraphs within a page. Each paragraph is enclosed within its own set of <p> tags. Here’s an example:
<!DOCTYPE html>
<html>
  <body>
    <h2>Welcome To My Website</h2>
    <p>This is the first paragraph.</p>
    <p>This is the second paragraph.</p>
  </body>
</html>
In this example, we have two paragraphs. The text within the first set of <p> tags will be displayed as the first paragraph, and the text within the second set will be displayed as the second paragraph. The browser automatically adds space before and after each paragraph, creating a visually pleasing layout.
Formatting and Display Properties of HTML Paragraphs
HTML paragraphs have default formatting and display properties that are important to understand and consider when designing your web pages.
Default Margins
By default, HTML paragraphs have margins added by the browser. This creates space both before and after the paragraph, visually separating it from other elements on the page.
Handling Multiple Spaces and Lines
HTML reduces multiple spaces to a single space and multiple lines to a single line. This behavior helps maintain consistent formatting and prevents excessive spacing or line breaks from affecting the layout of the page.
Changing the Display Property
The default display property of the paragraph element is set to “block”. This means that each paragraph is displayed on a new line, creating a block-level element. You can modify this behavior using CSS to change the display property to “inline” or other display values according to your specific requirements.
Line Breaks with the <br> Tag
While HTML paragraphs automatically create line breaks between paragraphs, you may sometimes need to add line breaks within a paragraph. This can be achieved using the <br> tag.
Syntax of the <br> Tag
The <br> tag is a self-closing tag, meaning it does not require a closing tag. Its syntax is simply <br>. When the browser encounters this tag, it inserts a line break at that point.
Example: Adding Line Breaks within a Paragraph
Let’s consider an example where we want to add line breaks within a paragraph:
<!DOCTYPE html>
<html>
  <body>
    <p>
      This paragraph has multiple<br>
      lines. But HTML reduces them to a single line,<br>
      omitting the carriage return we have used.
    </p>
  </body>
</html>
In this example, we have used the <br> tag to add line breaks within the paragraph. The browser will render the text with line breaks at the specified points, maintaining the overall structure and readability of the content.
Aligning Paragraphs with the align Attribute
HTML provides the align attribute to align paragraphs either to the left, right, or center of the page.
Syntax of the align Attribute
The align attribute can be used with the <p> tag to specify the alignment of the paragraph. The syntax is as follows: <p align="value">, where “value” can be “left”, “right”, or “center”.
Example: Aligning Paragraphs
Let’s see an example of aligning paragraphs:
<!DOCTYPE html>
<html>
  <body>
    <p align="center">Welcome to My Website</p>
    <p align="left">This is a left-aligned paragraph.</p>
    <p align="right">This is a right-aligned paragraph.</p>
  </body>
</html>
In this example, we have used the align attribute to align the paragraphs. The first paragraph is centered, the second is left-aligned, and the third is right-aligned. This attribute helps in creating visually appealing layouts by controlling the alignment of the paragraphs on the page.
Preserving Line Breaks and Spaces with the <pre> Tag
By default, HTML reduces multiple spaces and line breaks within a paragraph to a single space and a single line. However, if you want to preserve the formatting exactly as it is, including extra spaces and line breaks, you can use the <pre> tag.
Syntax of the <pre> Tag
The <pre> tag is used to define preformatted text, preserving both spaces and line breaks. Its syntax is as follows: <pre>Content</pre>, where “Content” represents the text or content of the paragraph.
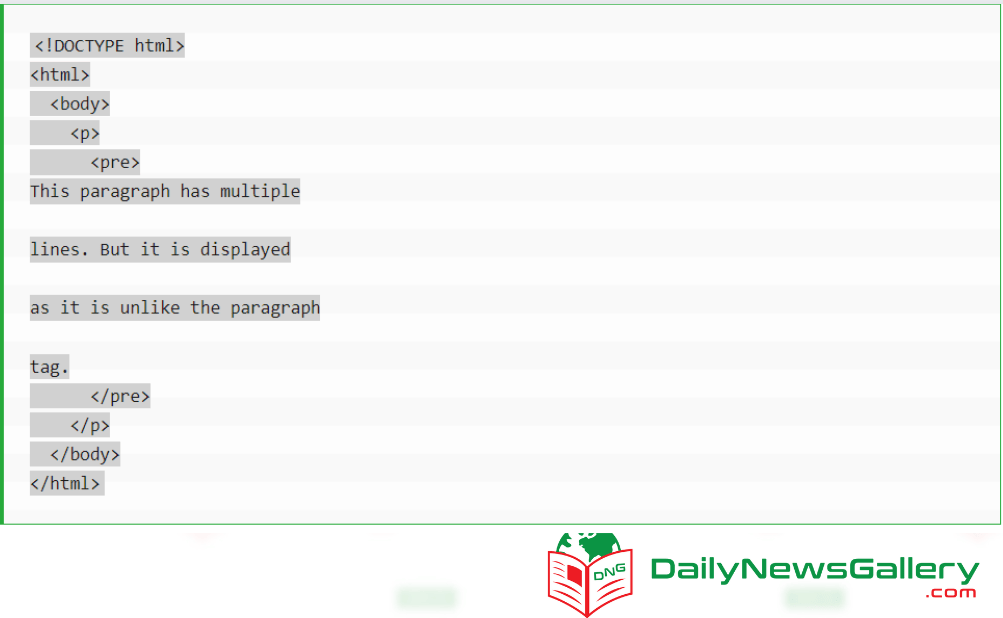
Example: Using the <pre> Tag within a Paragraph
Let’s consider an example where we want to preserve line breaks and extra spaces using the <pre> tag:
<!DOCTYPE html>
<html>
  <body>
    <p>
      <pre>
This paragraph has multiple

lines. But it is displayed

as it is unlike the paragraph

tag.
      </pre>
    </p>
  </body>
</html>
In this example, we have used the <pre> tag within a paragraph. The text within the <pre> tags will be displayed exactly as it is, preserving the line breaks and extra spaces we have used. This is useful when you want to display code snippets or maintain the exact formatting of a text block.
Browser Compatibility
HTML paragraphs are supported by all major web browsers, including Google Chrome, Internet Explorer, Microsoft Edge, Firefox, Opera, and Safari. The syntax and behavior of paragraphs remain consistent across these browsers, ensuring a consistent experience for users.
In this comprehensive guide, we have explored the various aspects of creating paragraphs in HTML. We started with an introduction to HTML paragraphs, discussing their purpose and syntax. We emphasized the importance of using the closing tag to ensure proper rendering. We then demonstrated the basic implementation of paragraphs through examples. Additionally, we discussed formatting and display properties, line breaks with the <br> tag, aligning paragraphs with the align attribute, and preserving line breaks with the <pre> tag. Finally, we covered browser compatibility to ensure a seamless experience for all users.
By mastering the art of creating paragraphs in HTML, you can effectively structure and organize your content, enhancing the readability and user experience of your web pages.