- Start by laying out all the parts and tools needed for assembly.
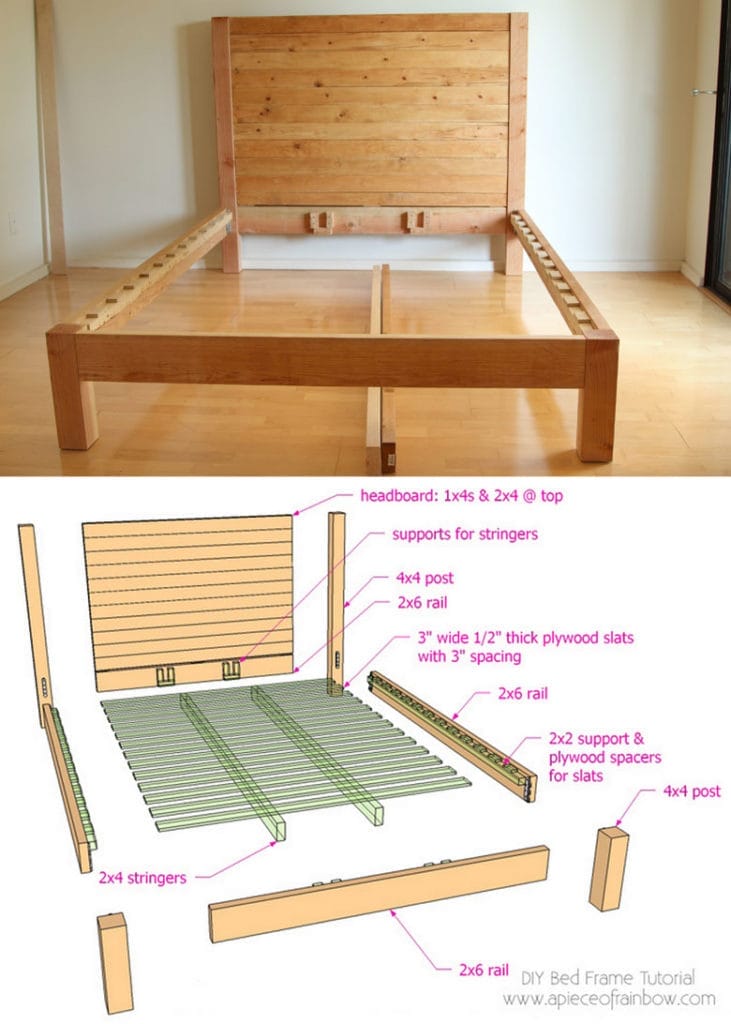
- Attach the side rails to the headboard using the provided screws.
- Connect the footboard to the side rails, ensuring everything is aligned.
- Secure the slats or support boards onto the frame for mattress support.
- Double-check all connections and tighten any loose screws.
How to Put Together a Wooden Bed Frame and Headboard: A Step-by-Step Guide
Building your own wooden bed frame and headboard can be a rewarding and cost-effective DIY project. Not only will you have a unique piece of furniture, but you'll also gain the satisfaction of creating something with your own hands. In this comprehensive guide, we'll walk you through the process of putting together a wooden bed frame and headboard, ensuring that you have all the necessary tools and knowledge to successfully complete the project.Tools and Materials Needed
Before we dive into the step-by-step instructions, let's go over the essential tools and materials you'll need for this project: 1. Measuring tape 2. Construction adhesive 3. Screwdriver or drill 4. Screws 5. Wood glue 6. Sandpaper 7. Clamps 8. Saw 9. Safety goggles 10. Wood stain or paint 11. Paintbrush or roller 12. Drop cloth or newspaperStep 1: Gather your materials
The first step in putting together a wooden bed frame and headboard is gathering all the necessary materials. Measure the space where you want to place the bed frame to ensure that it will fit properly. Decide on the type of wood you want to use for your frame and headboard, considering factors such as durability, cost, and aesthetic appeal. Make a list of all the tools and materials you'll need and purchase them before you begin the project. Now, let's move on to the assembly process.Assembling the Bed Frame
Step 2: Cut the wood
Start by measuring and cutting the wood pieces for the bed frame. This will typically include the side rails, end rails, and support beams. Use a saw to make straight cuts, ensuring that all pieces are the correct length and width.Step 3: Attach the rails to the headboard and footboard
Begin by attaching the side rails to the headboard and footboard. Apply a small amount of construction adhesive to each connection point and secure the rails with screws. Make sure the rails are straight and level before tightening the screws.Step 4: Install the support beams
Position the support beams perpendicular to the side rails, evenly spaced along the length of the bed frame. Use clamps to hold the support beams in place while you attach them to the side rails. Apply wood glue to each connection point and secure with screws.Optional: Adding slats for extra support
For added stability, you can install wooden slats across the support beams. Measure the spacing between the support beams and cut the slats accordingly. Attach the slats to the support beams using screws or construction adhesive.Building the Headboard
Step 5: Cut and sand the headboard pieces
Measure and cut the wood pieces for the headboard according to your desired design. Sand the edges of the pieces to remove any roughness or splinters.Step 6: Assemble the headboard
Lay out the headboard pieces on a flat surface and arrange them in the desired pattern. Apply wood glue to the edges of each piece and press them together firmly. Use clamps to hold the pieces in place while the glue dries.Step 7: Finish the headboard
Once the glue has dried, sand the entire headboard to ensure a smooth surface. Apply a wood stain or paint of your choice using a brush or roller. Allow the finish to dry completely before attaching the headboard to the bed frame.Additional Tips and Considerations
1. Always wear safety goggles when using power tools or working with wood. 2. Take accurate measurements and double-check them before making any cuts. 3. Sand all edges and surfaces of the wood to prevent splinters and ensure a professional finish. 4. Apply a protective finish to both the bed frame and headboard to preserve the wood and enhance its durability. 5. Consider adding decorative elements such as trim, molding, or upholstery to personalize your bed frame and headboard. By following these steps and tips, you'll be able to successfully put together a wooden bed frame and headboard. Remember to take your time, work safely, and enjoy the process of building your own custom piece of furniture. Happy building!Key Takeaways: How to Put Together a Wooden Bed Frame and Headboard?
- Start by gathering all the necessary tools and materials.
- Read and follow the assembly instructions carefully.
- Begin by assembling the bed frame according to the instructions.
- Attach the headboard securely to the bed frame using the provided hardware.
- Double-check all connections and tighten any loose screws or bolts.
Frequently Asked Questions
Putting together a wooden bed frame and headboard can be a rewarding DIY project. Here are some common questions and answers to help you in the process.
1. How do I choose the right wooden bed frame and headboard?
When selecting a wooden bed frame and headboard, consider the style, size, and material that will complement your bedroom decor. Look for high-quality hardwoods like oak or cherry for durability and longevity. Measure your mattress to ensure the frame and headboard are the correct size.
Additionally, think about the overall design of your bedroom. If you have a minimalist aesthetic, a simple and clean-lined bed frame and headboard may be the best choice. If you prefer a more traditional look, consider ornate carvings or a sleigh-style bed. Ultimately, choose a wooden bed frame and headboard that reflects your personal style and fits well into your bedroom space.
2. What tools do I need to assemble a wooden bed frame and headboard?
Assembling a wooden bed frame and headboard typically requires basic tools such as a screwdriver, allen wrench, and a rubber mallet. Check the manufacturer's instructions or manual provided with your bed frame for the specific tools needed.
In addition to the tools, having an extra pair of hands can be helpful for holding pieces in place during assembly. You may also want to have a level handy to ensure the bed frame and headboard are assembled straight and balanced.
3. How do I assemble the wooden bed frame?
Start by reading the instruction manual provided with your specific bed frame model. Lay out all the pieces and hardware, ensuring you have everything needed for assembly. Follow the step-by-step instructions and diagrams carefully.
Typically, you'll begin by assembling the basic frame structure, connecting the side rails, and attaching the center support beams. Next, attach the headboard to the frame using the provided brackets or screws. Finally, secure the slats or foundation onto the frame to provide support for the mattress.
4. How do I attach the headboard to the bed frame?
The method of attaching the headboard to the bed frame can vary depending on the specific model. Some bed frames come with pre-drilled holes and brackets that easily connect to the headboard. Others may require screwing the headboard directly onto the frame using provided screws.
Ensure the headboard is aligned properly with the bed frame before securing it. It's recommended to have someone hold the headboard in place while you attach it to the frame. Follow the manufacturer's instructions for the correct method of attachment.
5. Any tips for the final touches after assembling the wooden bed frame and headboard?
Once the bed frame and headboard are assembled, take a few moments to ensure everything is secure and level. Double-check that all screws and fasteners are tightened properly.
Afterward, consider placing a mattress protector or a mattress topper to enhance comfort. Dress the bed with suitable bedding, including sheets, pillows, and a comforter that match your style and preferences. Enjoy your newly assembled wooden bed frame and headboard!