Do you love listening to music or watching movies on your MacBook? If so, you might be wondering how to connect your Airpods to your Macbook. Well, you’ve come to the right place! In this guide, we’ll show you step-by-step how to pair your Airpods with your Macbook so you can enjoy your favorite sounds without any hassle.
So, you’ve got your Airpods and your Macbook ready, and you’re eager to get them connected. Don’t worry, it’s super easy! With just a few simple steps, you’ll be able to enjoy wireless audio in no time. Let’s dive in and explore how to connect your Airpods to your Macbook.
First things first, make sure your Airpods are charged and in their case. Then, open the lid of the Airpods case and bring it close to your Macbook. The magical world of Apple technology will work wonders, and a setup prompt will appear on your screen. Just click “Connect” and voila! Your Airpods are now connected to your Macbook. Easy peasy, right?
Whether you’re jamming to your favorite tunes or catching up on the latest Netflix series, connecting your Airpods to your Macbook adds a whole new level of convenience and enjoyment. So, let’s get started and connect those Airpods to your Macbook!
How to Connect Airpods to a MacBook
- Ensure that your Macbook has Bluetooth turned on.
- Open the Airpods case and place the earbuds in your ears.
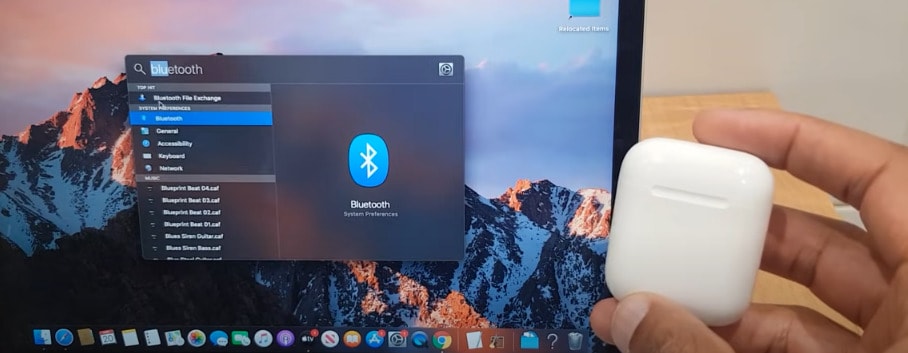
- On your Macbook, click on the Apple menu and select “System Preferences.”
- In the System Preferences window, click on “Bluetooth.”
- Wait for your Airpods to appear in the list of available devices and click “Connect.”
Now you can enjoy the seamless wireless experience of using Airpods with your Macbook.
Setting Up Airpods Preferences on Your MacBook
Now that your Airpods are successfully connected to your MacBook, it’s time to explore some of the preferences and settings you can customize to enhance your listening experience. Here are a few features and functionalities you can adjust:
1. Automatic Ear Detection: By default, your Airpods will automatically play audio when you put them in your ears. To enable or disable this feature, go to the Bluetooth settings on your MacBook, click on your Airpods, and check or uncheck the “Automatic Ear Detection” box.
2. Microphone Selection: If you use your Airpods for voice calls or recording, you can choose which microphone to use, the one on your Airpods or the built-in microphone on your MacBook. Go to the Sound settings on your MacBook, click on the Input tab, and select your preferred microphone.
3. Double-Tap Controls: Your Airpods come with convenient double-tap controls that allow you to customize what happens when you double-tap on either Airpod. To adjust these settings, go to the Bluetooth settings on your MacBook, click on your Airpods, and select “Double-Tap on Airpod” to choose the desired action.
By customizing these preferences, you can tailor your Airpods experience to your liking and make the most out of their features.
Troubleshooting Common Connection Issues
Although connecting Airpods to a MacBook is generally a smooth process, you may occasionally encounter some connection issues. Here are some common problems and their solutions:
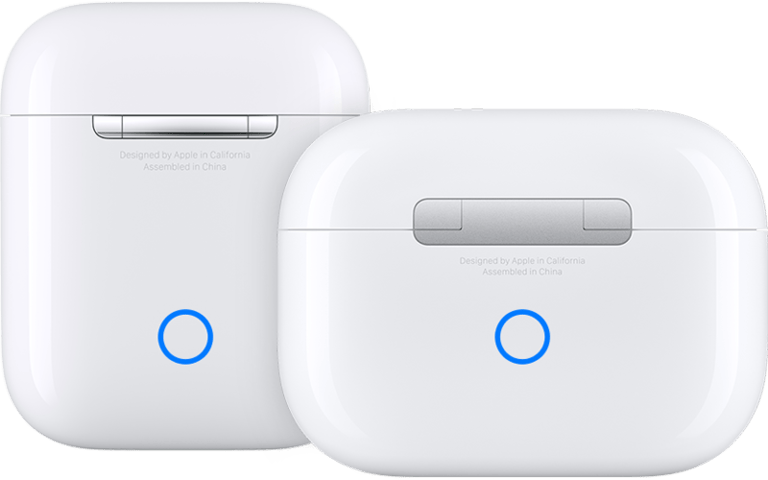
1. Airpods Not Showing Up in Bluetooth Settings: If your Airpods are not appearing in the Bluetooth devices list on your MacBook, make sure they are in pairing mode by opening the lid of the case and holding down the setup button on the back until the LED light flashes white. If the issue persists, try resetting your Airpods by holding down the setup button for 15 seconds until the LED light flashes amber.
2. Intermittent Audio or Poor Sound Quality: If you’re experiencing choppy or distorted audio while using your Airpods with your MacBook, make sure there are no physical obstructions between your Airpods and your MacBook. Additionally, ensuring that your Airpods are fully charged can help improve sound quality. Lastly, try disconnecting and reconnecting your Airpods or restarting your MacBook to resolve any temporary software issues.
3. Airpods Disconnecting Frequently: If your Airpods keep disconnecting from your MacBook, try resetting the Bluetooth module on your MacBook. Go to the Bluetooth settings, click on the “X” next to your Airpods, then restart your MacBook and pair your Airpods again.
By following these troubleshooting steps, you can easily resolve common connection issues and enjoy uninterrupted audio with your Airpods and MacBook.
Beyond Basic Pairing
Now that you have successfully connected your Airpods to your MacBook, let’s explore some of the advanced features and functionalities that can enhance your audio experience.
Using Airpods with Siri on Your MacBook
One of the notable features of Airpods is their seamless integration with Siri, Apple’s virtual assistant. You can use Siri on your MacBook with your Airpods to perform various tasks hands-free. Here’s how:
1. Activate Siri on your MacBook.
– Double-tap on either Airpod or say “Hey Siri” to wake up Siri on your MacBook.
2. Give voice commands and enjoy hands-free control.
– You can ask Siri to play music, adjust the volume, send messages, set reminders, and perform various other tasks without using your keyboard or trackpad.
Using Siri with your Airpods on your MacBook allows for convenient and hands-free control over your device.
Airpods and MacBook
Connecting your Airpods to your MacBook opens up a world of possibilities for seamless wireless audio. Whether you’re working, watching movies, or listening to music, the combination of Airpods and MacBook provides a premium audio experience.
By following the steps outlined in this guide, you can easily connect your Airpods, explore additional features, and troubleshoot any connection issues. Enjoy the freedom and convenience of wireless audio with your Airpods and MacBook!
Frequently Asked Questions
Connecting your Airpods to a Macbook is a simple process that allows you to enjoy wireless audio while using your computer. Here are the answers to some common questions related to connecting Airpods to a Macbook.
1. How do I pair my Airpods with a Macbook?
To pair your Airpods with a Macbook, start by opening the lid of the Airpods case. On your Macbook, go to the Apple menu and select “System Preferences.” Then, click on “Bluetooth” and make sure it is turned on. Your Airpods should appear in the list of available devices.
Click on the Airpods in the list and click “Pair” to connect them to your Macbook. Once paired, you can start using your Airpods with your Macbook.
Alternatively, you can also connect your Airpods to your Macbook by clicking on the Bluetooth icon in the menu bar, selecting your Airpods from the dropdown menu, and clicking “Connect.”
2. Can I use Airpods with a Macbook that has older Bluetooth technology?
Yes, you can use Airpods with a Macbook that has older Bluetooth technology. Airpods are compatible with Macbook models that support Bluetooth 4.0 or later. To check if your Macbook has the necessary Bluetooth technology, go to the Apple menu, select “About This Mac,” and click on “System Report.” Under the “Hardware” section, click on “Bluetooth” and look for the “LMP Version.” If the LMP Version is 4.0 or higher, your Macbook is compatible with Airpods.
If your Macbook has an older Bluetooth version, you can still connect your Airpods using a Bluetooth dongle or adapter that is compatible with your Macbook’s USB port. Simply plug in the dongle or adapter, follow the pairing instructions, and you should be able to use your Airpods with your Macbook.
3. How do I switch the audio output to Airpods on my Macbook?
To switch the audio output to your Airpods on your Macbook, start by opening the lid of the Airpods case if they are not already connected. Then, click on the volume icon in the menu bar and select your Airpods from the list of available output devices.
You may need to click on “Show volume in menu bar” in the Sound preferences to have the volume icon visible. Once selected, the audio output will be switched to your Airpods, and you can start enjoying wireless audio on your Macbook.
You can also switch the audio output to your Airpods by going to the Apple menu, selecting “System Preferences,” and clicking on “Sound.” In the “Output” tab, select your Airpods from the list of available devices. Your Macbook will now route audio output to your Airpods.
4. Can I use only one Airpod with my Macbook?
Yes, you can use only one Airpod with your Macbook. Each Airpod can function independently, allowing you to use either the left or right Airpod on its own. This can be useful if you need to keep one ear free to listen to your surroundings or if you prefer mono audio.
Simply take one Airpod out of the case, put it in your ear, and follow the pairing process outlined in the first question. Your Macbook will recognize the single Airpod and route audio to it.
If you want to use both Airpods simultaneously, make sure both Airpods are charged and follow the usual pairing process. Your Macbook will treat the Airpods as a stereo output and route audio to both Airpods.
5. How do I disconnect my Airpods from my Macbook?
To disconnect your Airpods from your Macbook, start by turning off Bluetooth on your Macbook. You can do this by going to the Apple menu, selecting “System Preferences,” clicking on “Bluetooth,” and toggling the Bluetooth option off. Alternatively, you can click on the Bluetooth icon in the menu bar and select “Turn Bluetooth Off.”
If you want to temporarily disconnect your Airpods without turning off Bluetooth, you can place them back in the case or out of range of your Macbook. Once the Airpods are out of range or back in the case, they will automatically disconnect from your Macbook.
So, to connect your AirPods to your MacBook, first, open the lid of the AirPods case. Then, go to the Bluetooth preferences on your MacBook and select your AirPods from the list of available devices. Once connected, you can enjoy wireless audio on your MacBook using your AirPods.
Remember, if your AirPods are not automatically connecting, you may need to manually select them from the Bluetooth menu. And don’t forget to keep your AirPods charged so you can enjoy uninterrupted music and calls on your MacBook!


