Are you wondering how to set up wireless projection? Well, you’re in luck! In this guide, we’ll show you the ropes and help you get started with wireless projection in no time. So, whether you want to share photos, videos, or presentations on a big screen without the hassle of cables, we’ve got you covered. Let’s dive in and explore the exciting world of wireless projection!
Imagine being able to effortlessly project your favorite movies, videos, or even games onto a big screen without the need for messy cables. With wireless projection, you can bring your entertainment to life in a whole new way. Plus, it’s not just limited to recreational use; wireless projection can also be a game-changer for business presentations and classroom settings. The possibilities are endless!
So, how exactly can you set up wireless projection? Don’t worry, it’s easier than you might think. In the following sections, we’ll walk you through the step-by-step process of setting up a wireless projection system. We’ll cover everything from choosing the right equipment to connecting your devices and troubleshooting common issues. By the end of this guide, you’ll be a wireless projection pro, ready to share your content with the world without the hassle of cables. Let’s get started!
Ready to set up wireless projection? Here’s a simple guide to get you started:
- Ensure your device supports wireless projection.
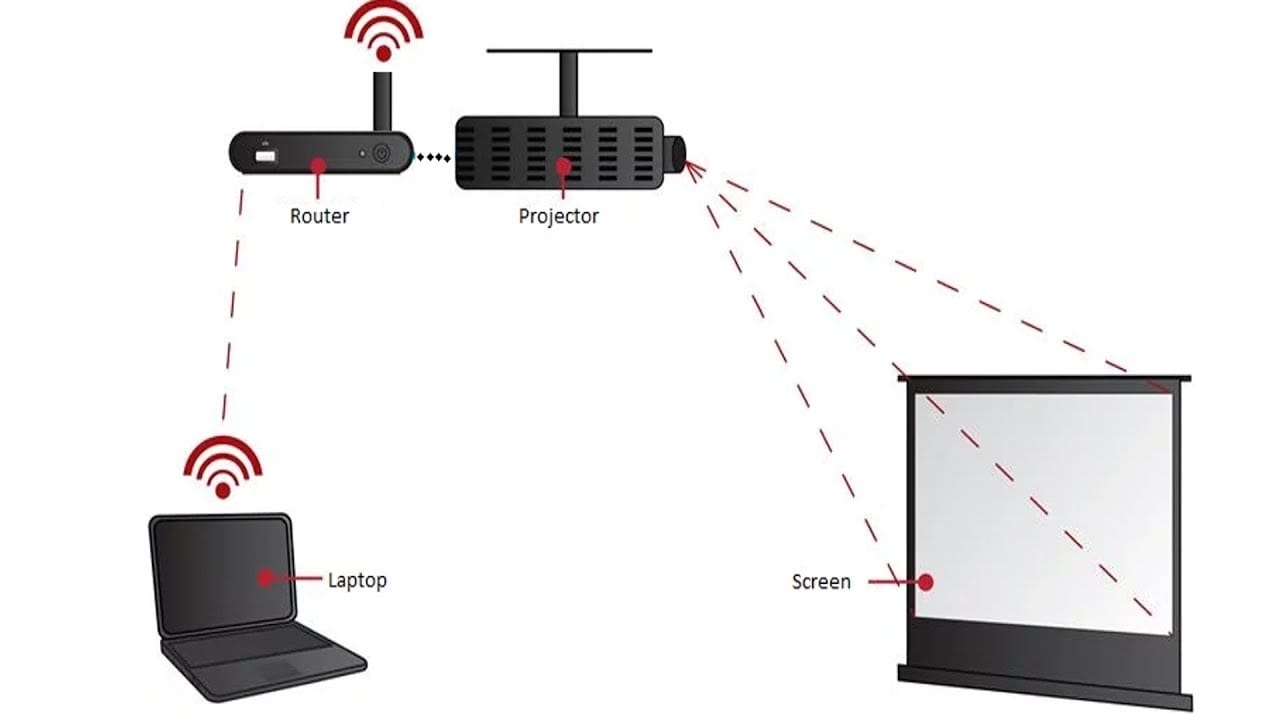
- Connect your device to the same Wi-Fi network as the projector.
- Open the projection app on your device.
- Select the projector you want to connect to.
- Follow the instructions to establish a wireless connection.
With these steps, you’ll be enjoying wireless projection in no time!

How to Set Up Wireless Projection: A Complete Guide
Imagine being able to effortlessly share your presentations, videos, and photos on a big screen without the inconvenience of cables. With wireless projection, you can make this a reality. In this comprehensive guide, we will walk you through the process of setting up wireless projection, from choosing the right equipment to troubleshooting common issues. Whether you’re a business professional, educator, or home theater enthusiast, this guide has got you covered.
Choosing the Right Wireless Projection System
When it comes to wireless projection, there are various options available in the market. Let’s explore three popular ones: Wi-Fi-enabled projectors, wireless HDMI adapters, and screen mirroring devices.
1. Wi-Fi-enabled projectors: These projectors come with built-in Wi-Fi capabilities, allowing you to connect your devices directly to the projector without the need for additional adapters. They offer seamless connectivity and are ideal for those who prioritize simplicity.
2. Wireless HDMI adapters: These small devices plug into the HDMI port of your regular projector or TV and enable wireless streaming of content from your devices. Simply connect the adapter to your device and enjoy wireless projection. They are a cost-effective option if you already own a projector or TV.
3. Screen mirroring devices: These devices, such as Apple TV or Google Chromecast, allow you to mirror the screen of your smartphone, tablet, or computer onto a larger display. They are versatile and work well with multiple devices, making them a popular choice for those who want flexibility.
Once you have decided on the type of wireless projection system that suits your needs, it’s time to proceed with the setup process.
Setting Up Wi-Fi-enabled Projectors
Setting up a Wi-Fi-enabled projector is straightforward and usually involves the following steps:
1. Choose a suitable location for your projector and ensure it is within range of your Wi-Fi network.
2. Connect the projector to a power source and turn it on. Follow the manufacturer’s instructions to access the projector’s settings menu.
3. Navigate to the network settings and select your Wi-Fi network from the available options. Enter the network password if prompted.
4. Once connected, your projector will display a unique connection code. Make a note of this code as you will need it to connect your devices.
5. On your smartphone, tablet, or computer, go to the Wi-Fi settings and select the projector’s network name. Enter the connection code when prompted.
6. Open the content you want to project and select the wireless projection option. Choose the projector from the list of available devices.
7. Voila! Your content should now be wirelessly projected onto the big screen.
Benefits of Wi-Fi-enabled Projectors
Wi-Fi-enabled projectors offer several advantages:
1. Convenience: With no cables to connect, setup becomes effortless, saving you time and eliminating tripping hazards.
2. Mobility: Since your devices can connect to the projector wirelessly, you have the freedom to move around the room while still controlling the projected content.
3. Versatility: Wi-Fi-enabled projectors often support various file formats, allowing you to project presentations, videos, and images with ease.
Tips for Optimal Performance
To ensure optimal performance with your Wi-Fi-enabled projector, keep the following tips in mind:
1. Place the projector within a reasonable range of your Wi-Fi router to maintain a stable and strong connection.
2. Keep the projector’s firmware up to date. Check the manufacturer’s website periodically for any available updates.
3. Use a dedicated Wi-Fi network for your projection needs. This prevents interference from other devices on the same network and ensures a smoother experience.
Now that you have a good understanding of setting up Wi-Fi-enabled projectors, let’s explore the setup process for wireless HDMI adapters and screen mirroring devices.
Setting Up Wireless HDMI Adapters
Wireless HDMI adapters are an excellent choice if you already have a regular projector or TV. Here’s how to set them up:
1. Start by connecting the wireless HDMI adapter to the HDMI port of your projector or TV. Ensure it is securely plugged in.
2. Connect the power cable to the adapter and plug it into a power source. The adapter will turn on automatically.
3. On your smartphone, tablet, or laptop, install the necessary app or software for the wireless HDMI adapter. Follow the on-screen instructions to complete the setup.
4. Once the setup is complete, go to the settings of your device and select the wireless HDMI adapter as the display option.
5. Open the content you want to project and enjoy wireless projection on the big screen.
Benefits of Wireless HDMI Adapters
Wireless HDMI adapters offer the following benefits:
1. Affordability: If you already have a projector or TV, a wireless HDMI adapter is a cost-effective way to enable wireless projection without investing in a new Wi-Fi-enabled projector.
2. Compatibility: Wireless HDMI adapters work with a wide range of devices, including smartphones, tablets, and laptops, making them versatile for different users.
3. Plug-and-play: These adapters are easy to set up and require minimal technical knowledge. Simply plug them in, connect your device, and start projecting.
Troubleshooting Tips
If you encounter any issues with your wireless HDMI adapter, try these troubleshooting tips:
1. Ensure that both the adapter and your device are connected to the same Wi-Fi network.
2. Check that all cables are securely plugged in and that the adapter is receiving power.
3. Restart your device and the adapter to refresh the connection.
4. Make sure your device’s software is up to date. Check for any available updates and install them if necessary.
5. If you continue to experience difficulties, consult the manufacturer’s website or contact their customer support for further assistance.
With wireless projection, the possibilities are endless. Whether you’re giving a presentation, hosting a movie night, or sharing memories with friends and family, the convenience and flexibility of wireless projection enhance the overall experience. By following the step-by-step instructions and tips in this guide, you can easily set up wireless projection and enjoy the seamless connectivity it offers. Embrace the freedom of wireless projection and take your media sharing to the next level.
How can I set up wireless projection?
In this article, we will discuss how you can set up wireless projection easily. Let’s get started!
Key Takeaways:
- Make sure your projector and device are connected to the same Wi-Fi network.
- Use a wireless HDMI adapter or Miracast to connect your device to the projector wirelessly.
- Install any necessary apps or software on your device to enable wireless projection.
- Adjust the display settings on your device and ensure the projector is set to the correct input source.
- Enjoy wireless projection and effortlessly share your content on the big screen!
Frequently Asked Questions
In this section, we’ve compiled five common questions and their answers related to setting up wireless projection. Whether you’re trying to connect your laptop to a projector or stream media wirelessly, we’ve got you covered!
1. How do I connect my laptop to a wireless projector?
To connect your laptop to a wireless projector, follow these steps:
First, ensure that your laptop and the wireless projector are on the same Wi-Fi network. Next, go to the display settings on your laptop and select “Connect to a wireless display.” Your laptop will start searching for available wireless projectors. Select the name of the projector from the detected devices list, and follow any on-screen prompts to complete the connection. Once connected, your laptop’s screen should be wirelessly projected onto the larger display.
2. Can I use my smartphone for wireless projection?
Yes, you can use your smartphone for wireless projection with the help of specific apps or built-in features. Both Android and iOS devices offer screen mirroring options. On Android, look for the “Cast” feature in your phone’s settings or quick settings panel and select the wireless projector to connect. For iOS devices, use AirPlay to connect to an Apple TV or a compatible wireless projector. Some wireless projectors also have dedicated mobile apps for seamless connection with smartphones, so check the projector’s documentation for more information.
3. What equipment do I need for wireless projection?
To set up wireless projection, you’ll typically need a wireless projector, a device (such as a laptop or smartphone) capable of wirelessly connecting to the projector, and a stable Wi-Fi network. Some wireless projectors may require additional adapters or dongles to establish the connection. It’s important to check the specifications and requirements of your specific projector model to ensure compatibility with your devices and network.
4. Can I stream media wirelessly to a projector?
Yes, you can stream media wirelessly to a projector by using streaming devices or apps. Many wireless projectors have built-in support for popular streaming services like Netflix, YouTube, and Amazon Prime Video. Simply connect the wireless projector to your Wi-Fi network and access the streaming apps directly on the projector. Alternatively, you can use streaming devices such as Google Chromecast or Amazon Fire TV Stick, which plug into the projector’s HDMI port and allow you to stream content wirelessly from your smartphone, tablet, or computer.
5. How secure is wireless projection?
Wireless projection can be secure if proper precautions are taken. Here are some tips to enhance security:
First, ensure that your wireless projector and the devices connecting to it are running the latest firmware or software updates, as these often include security patches. Use strong Wi-Fi passwords and consider using a separate network specifically for wireless projection to minimize the risk of unauthorized access. Additionally, keep your devices protected with up-to-date antivirus software and avoid connecting to public Wi-Fi networks when wirelessly projecting sensitive content. Finally, be cautious about granting permissions to unknown or untrusted devices when prompted during the connection process.
Summary
If you want to set up wireless projection, here’s what you need to do:
First, make sure you have a wireless projector and a device that supports screen mirroring. Connect both devices to the same Wi-Fi network. Then, enable screen mirroring on your device and connect it to the projector. Finally, start projecting wirelessly and enjoy your content on the big screen!
Remember, wireless projection is a convenient way to share photos, videos, and presentations without any messy cables. Follow these simple steps, and you’ll be able to enjoy a wireless projection experience in no time!